
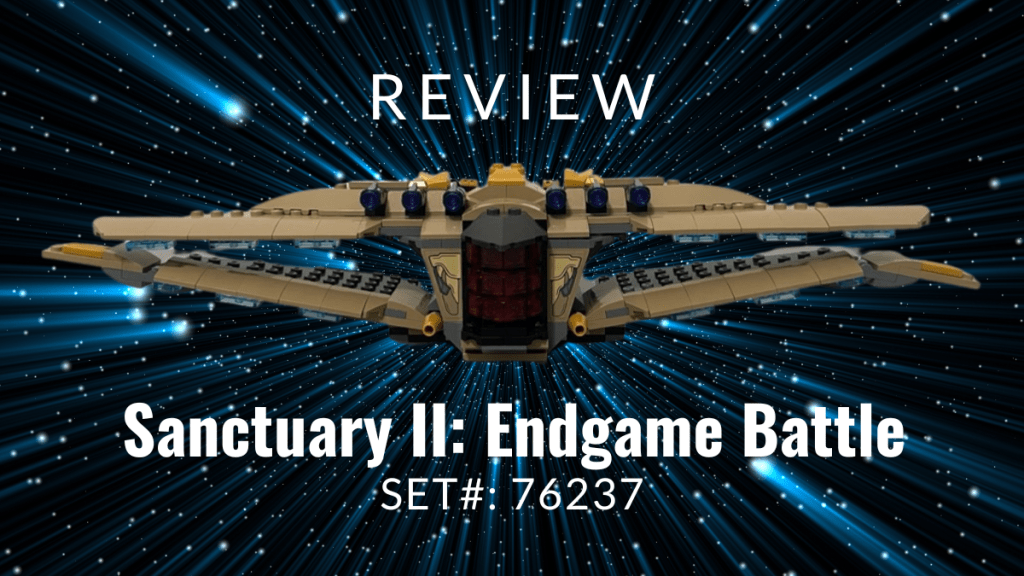
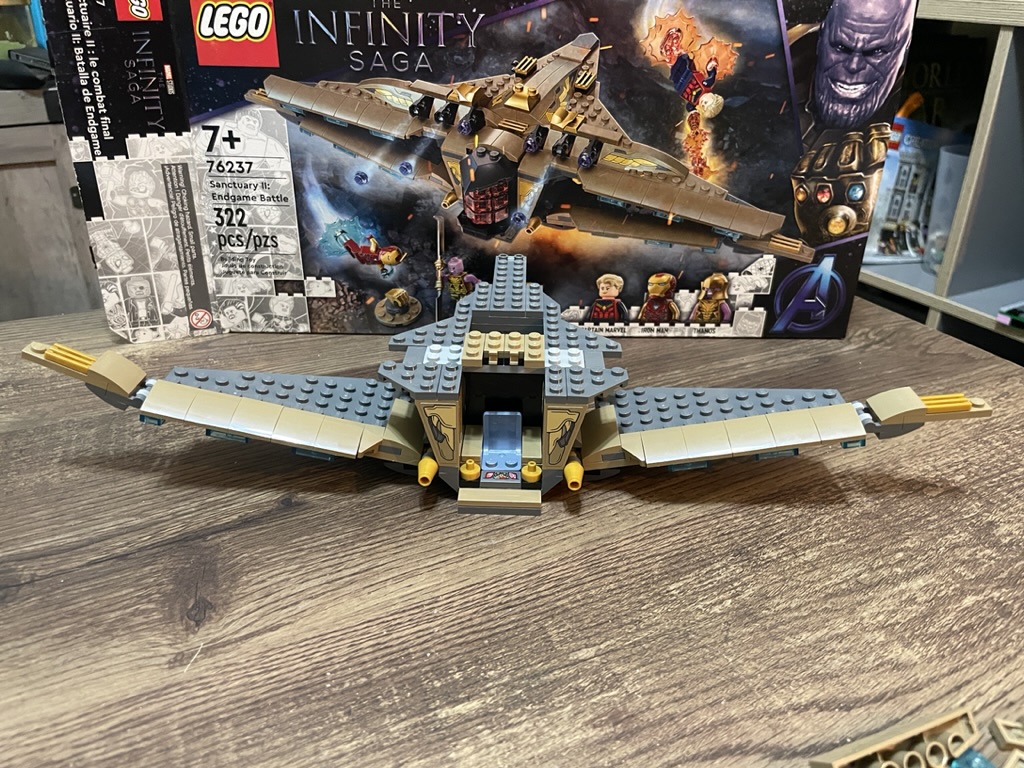
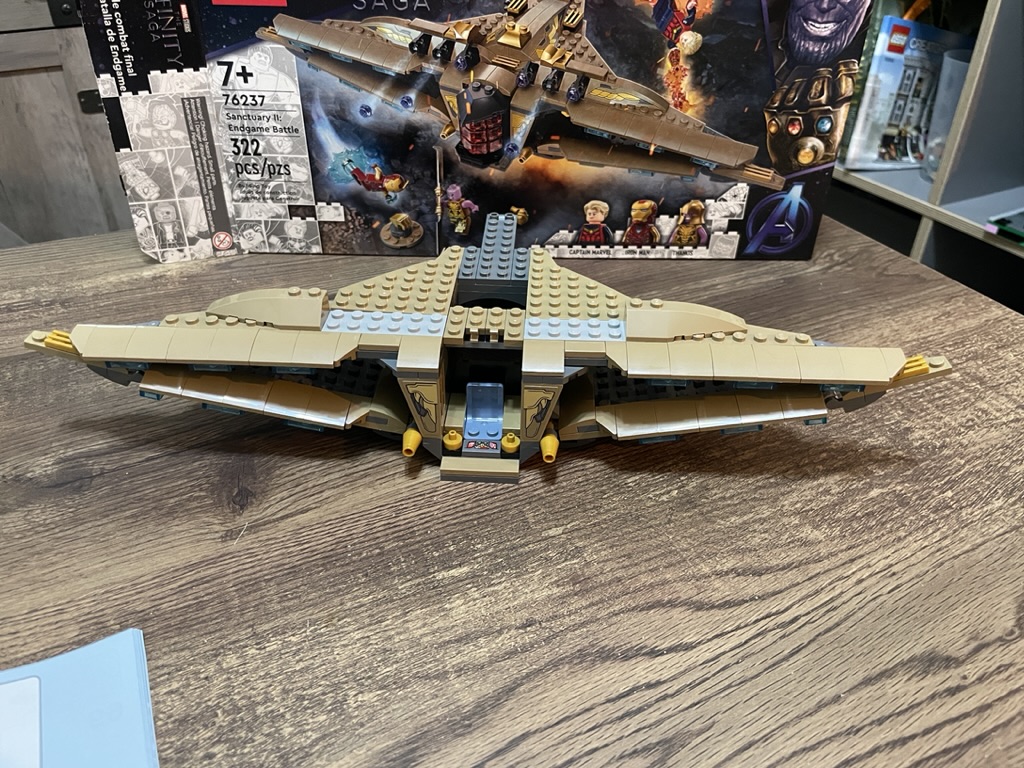
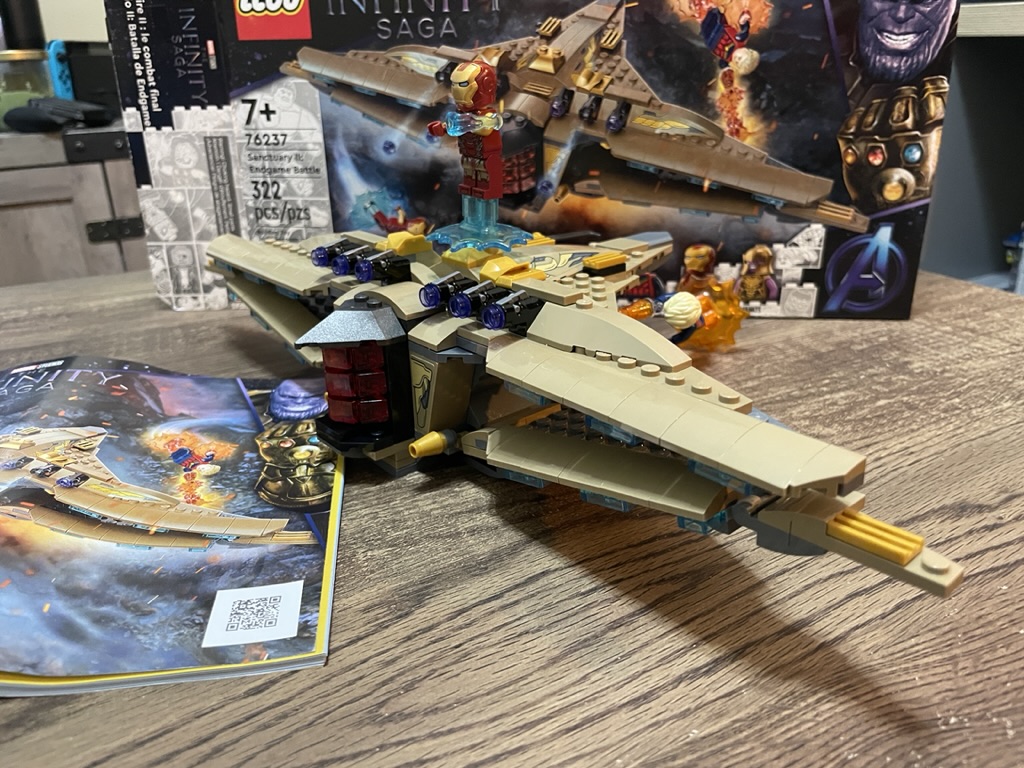
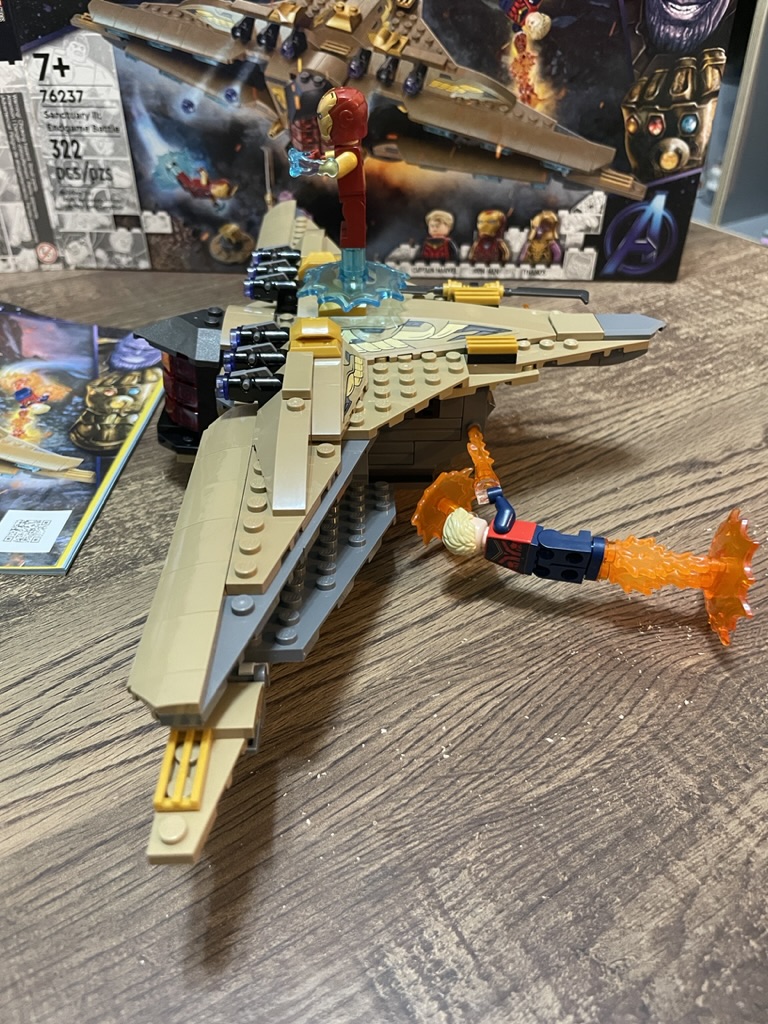
Set Name: Sanctuary II: Endgame Battle
Set Number: 76237
Pieces: 322
MSRP: $39.99, Retired
Theme: Marvel
Age: 7+
Available: Oct 1st, 2021 –
Dec 31st, 2022
Why I bought this set
Being a Marvel fan, my interest always piques when I see sets from this theme on sale. I had just decided to have a “flying objects” Lego collection (spaceships and birds) when the Lego end-of-year sale had this set listed for 20% off. As it was retiring that month, I had to determine quickly if I wanted the set in my collection, and I decided the look of the ship and the minifigures were worth the purchase. Since then, I’ve slowly been gathering what I need to make an Endgame battle MOC, and as this spaceship is essential for that, I am glad I picked this up.
The build
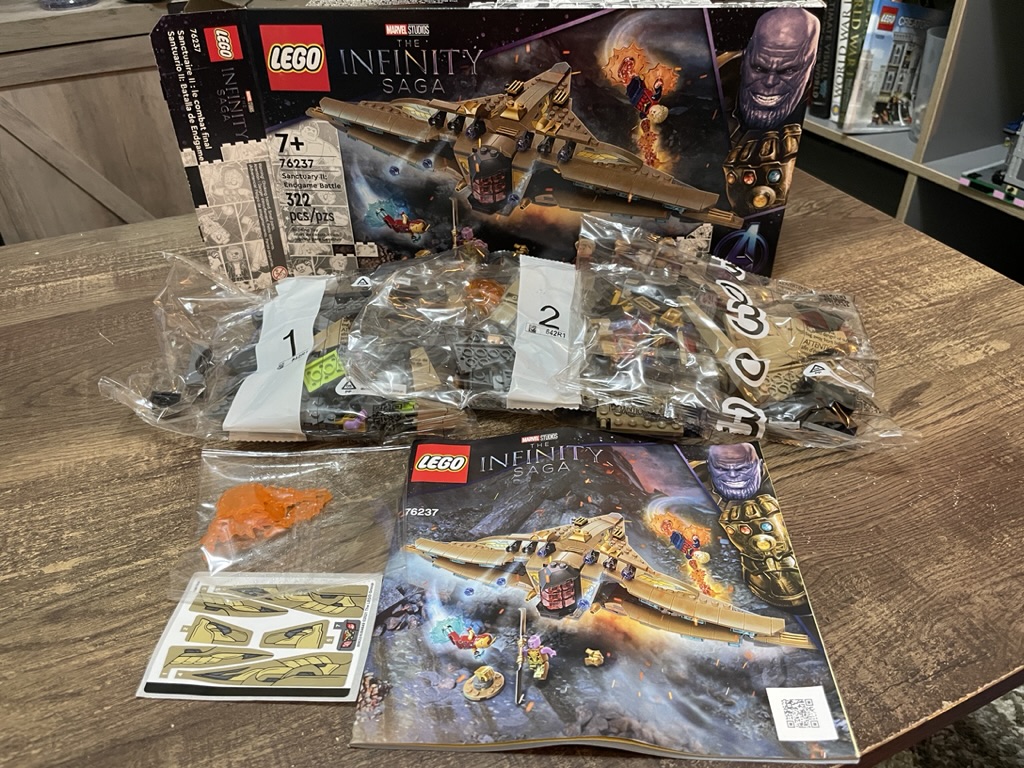
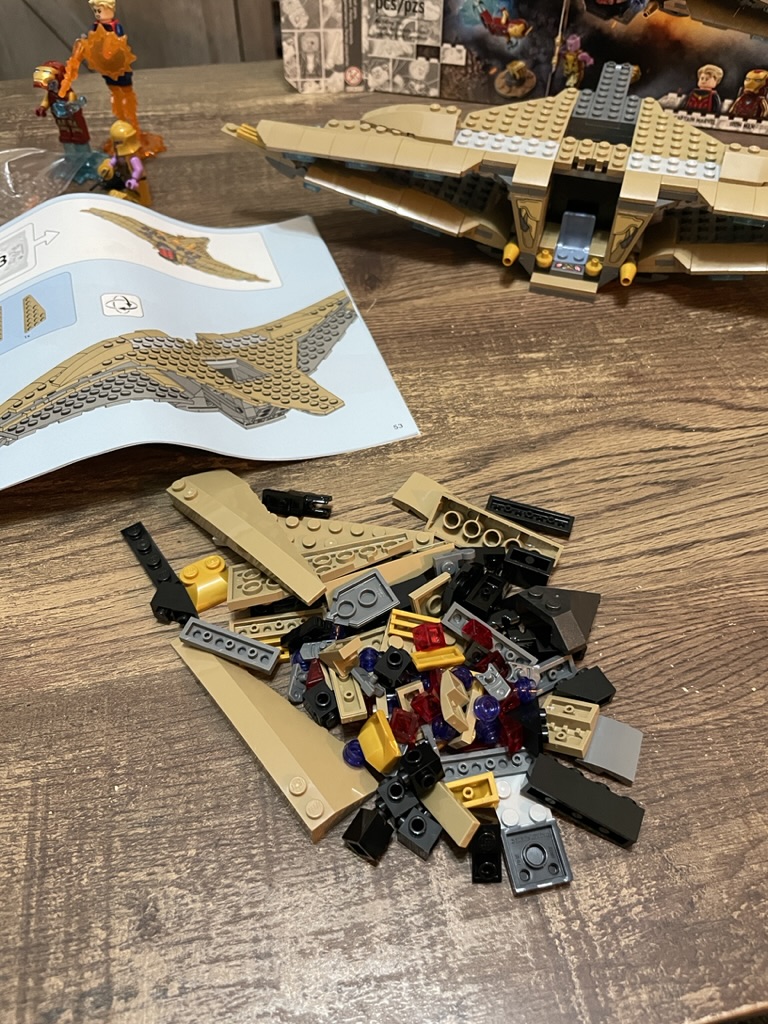
The ship is assembled over three stages and is outlined in a 76-page instruction booklet. There is a small sticker sheet included, which always gives me anxiety! The box artwork is typical for the infinity saga sets, with the build shown in the center, the minifigures displayed at the bottom right, and Thanos in the corner.
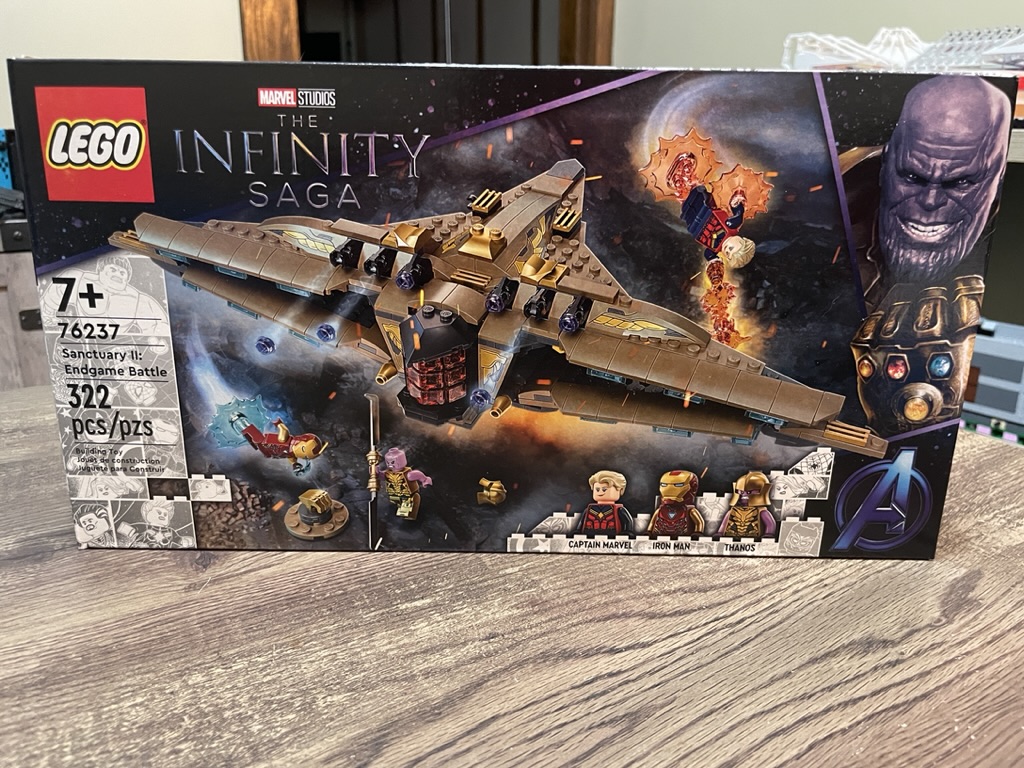
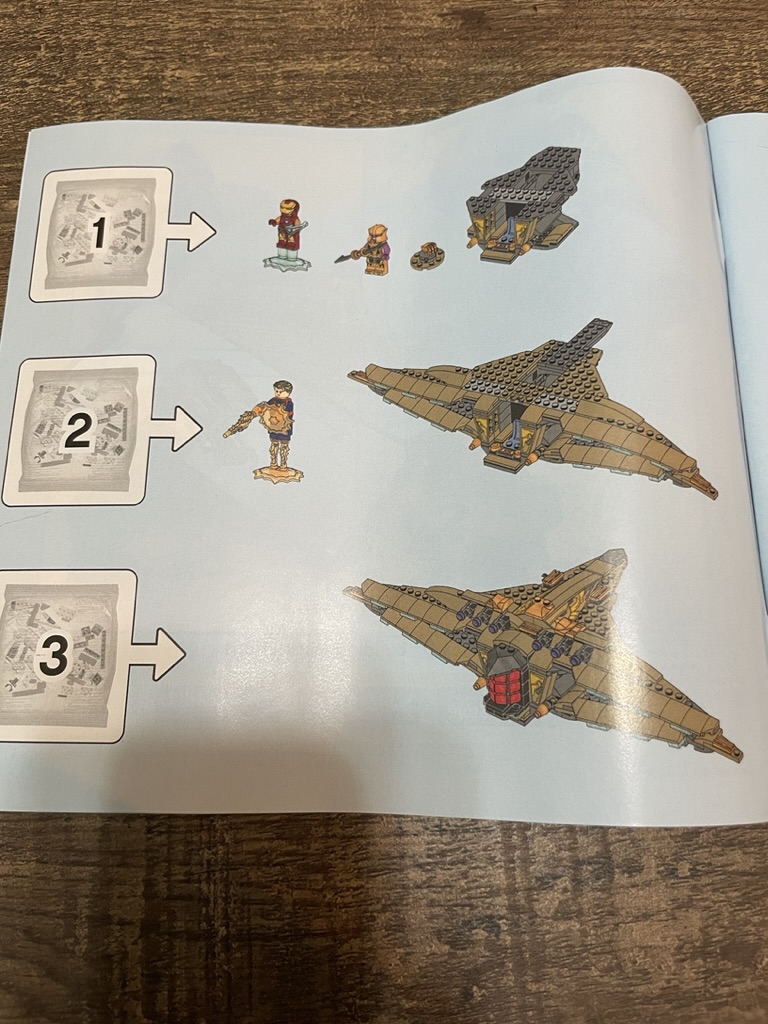
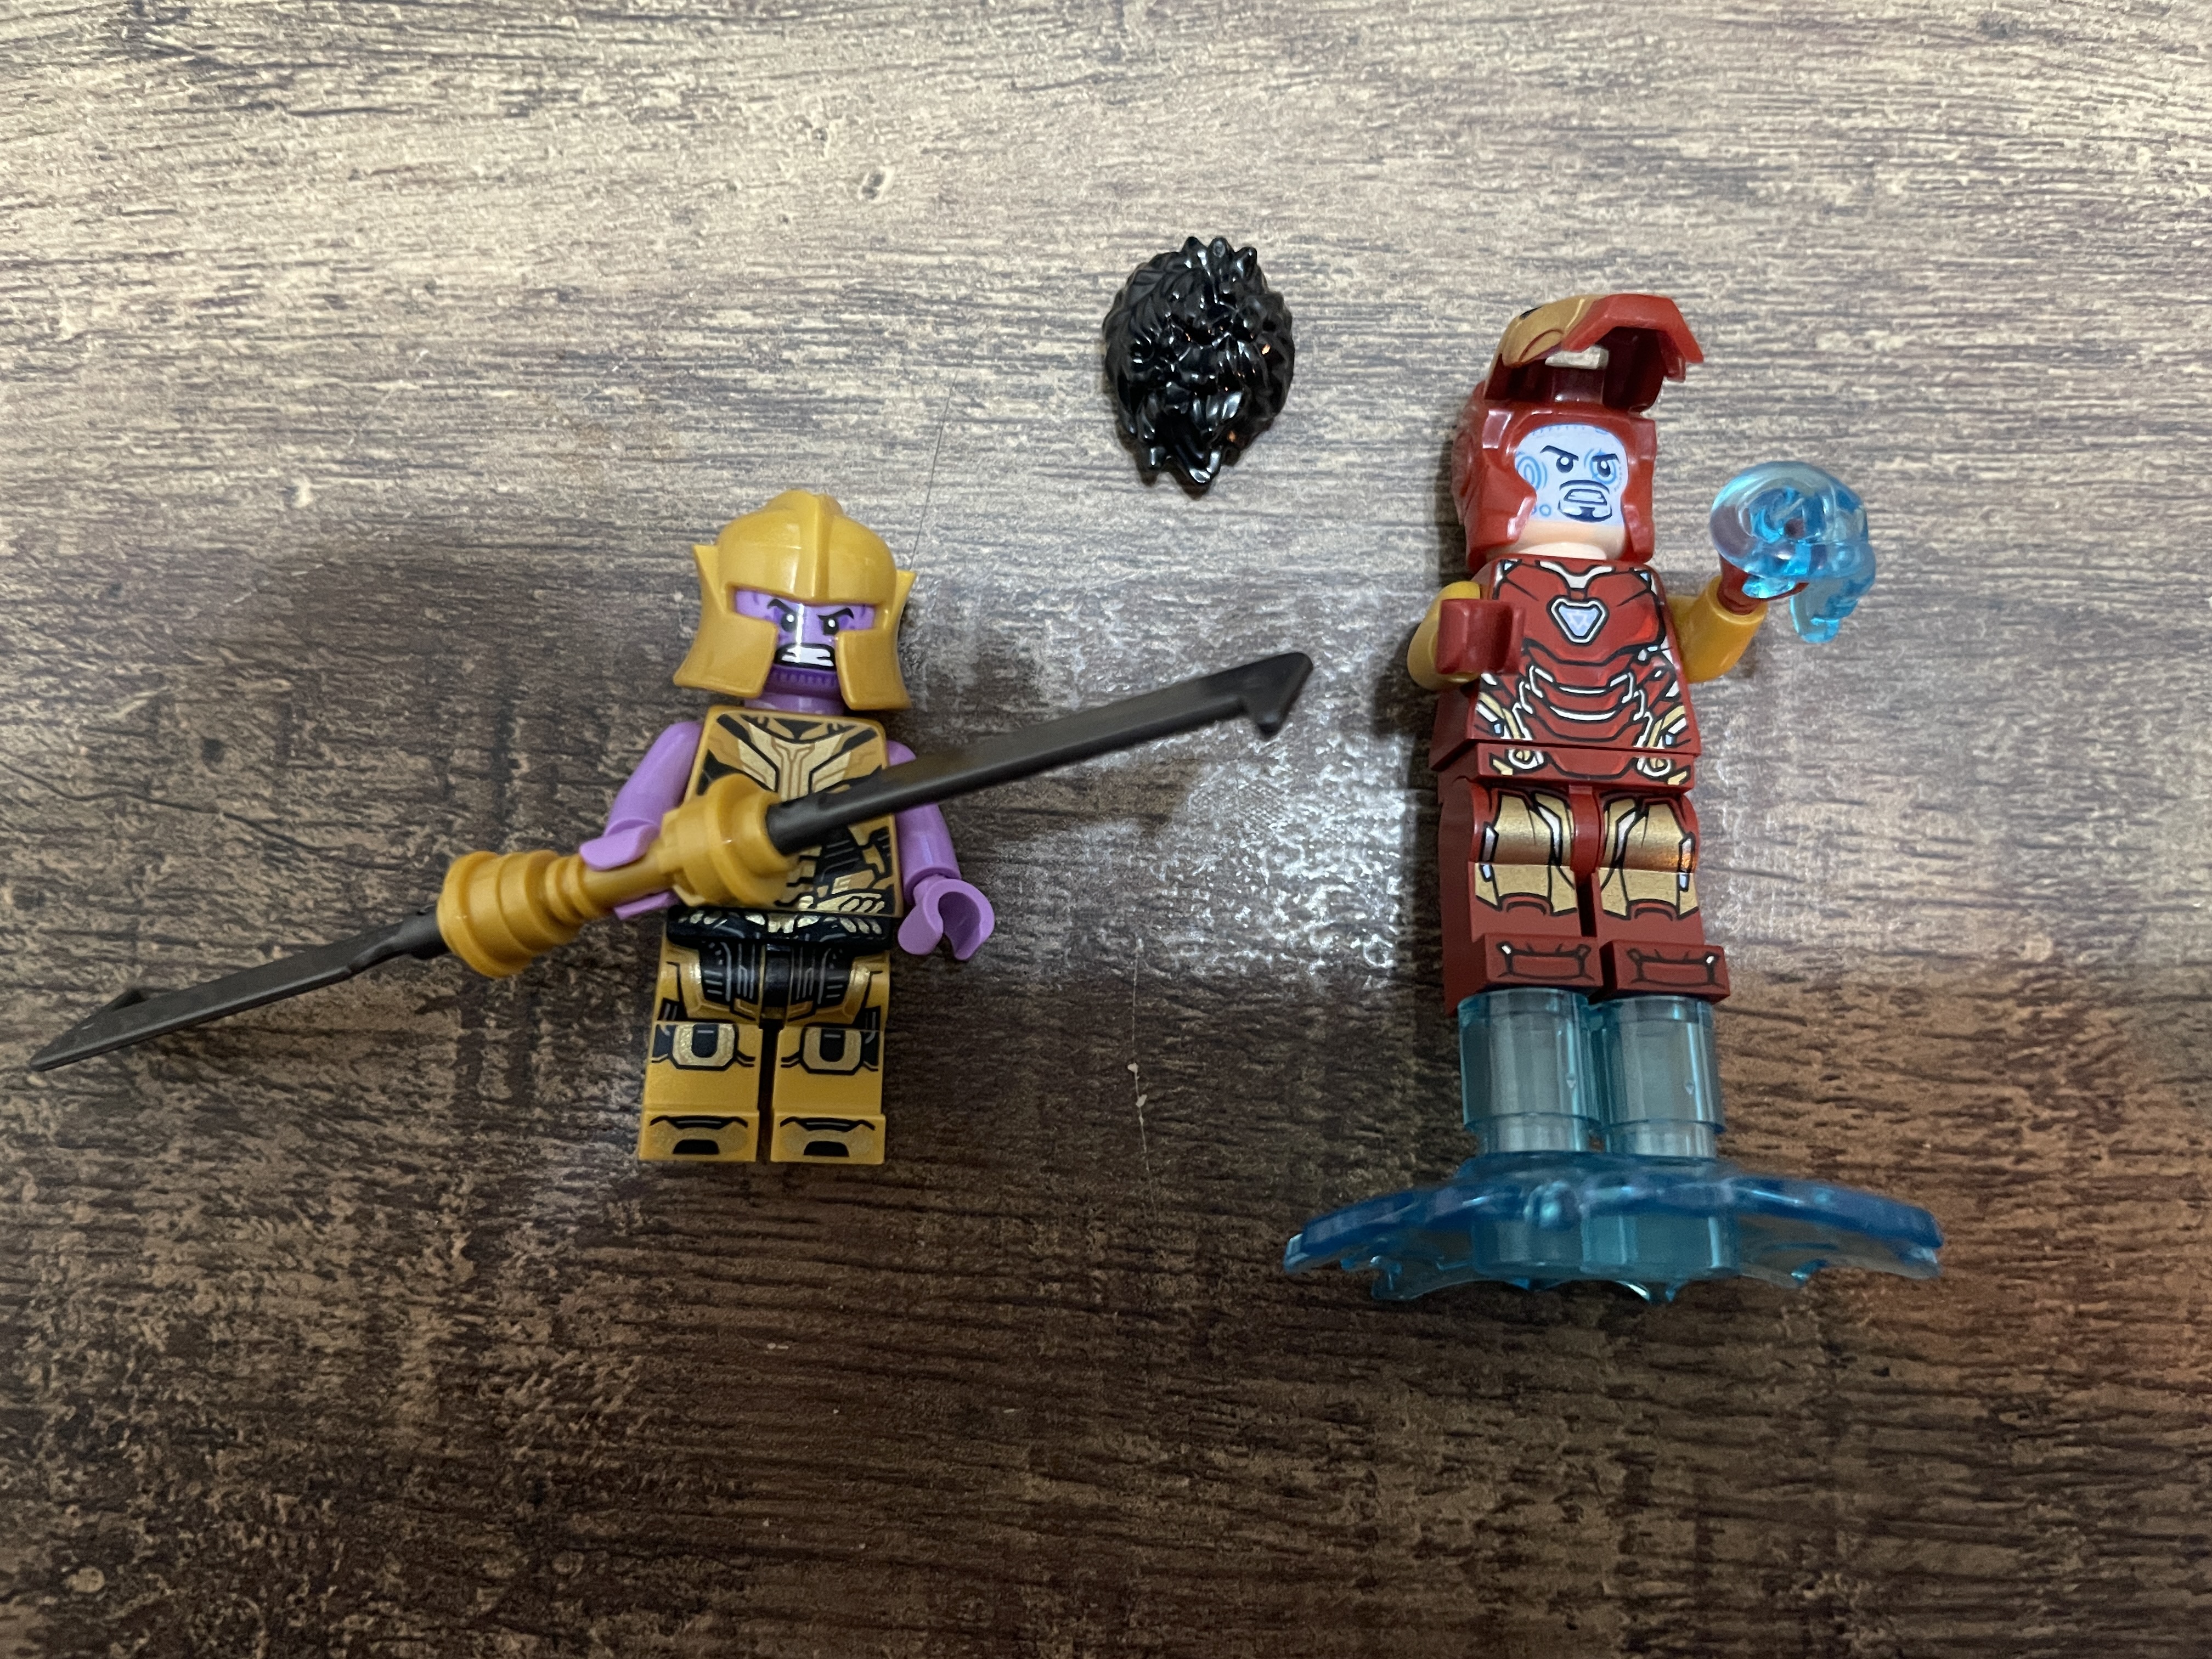
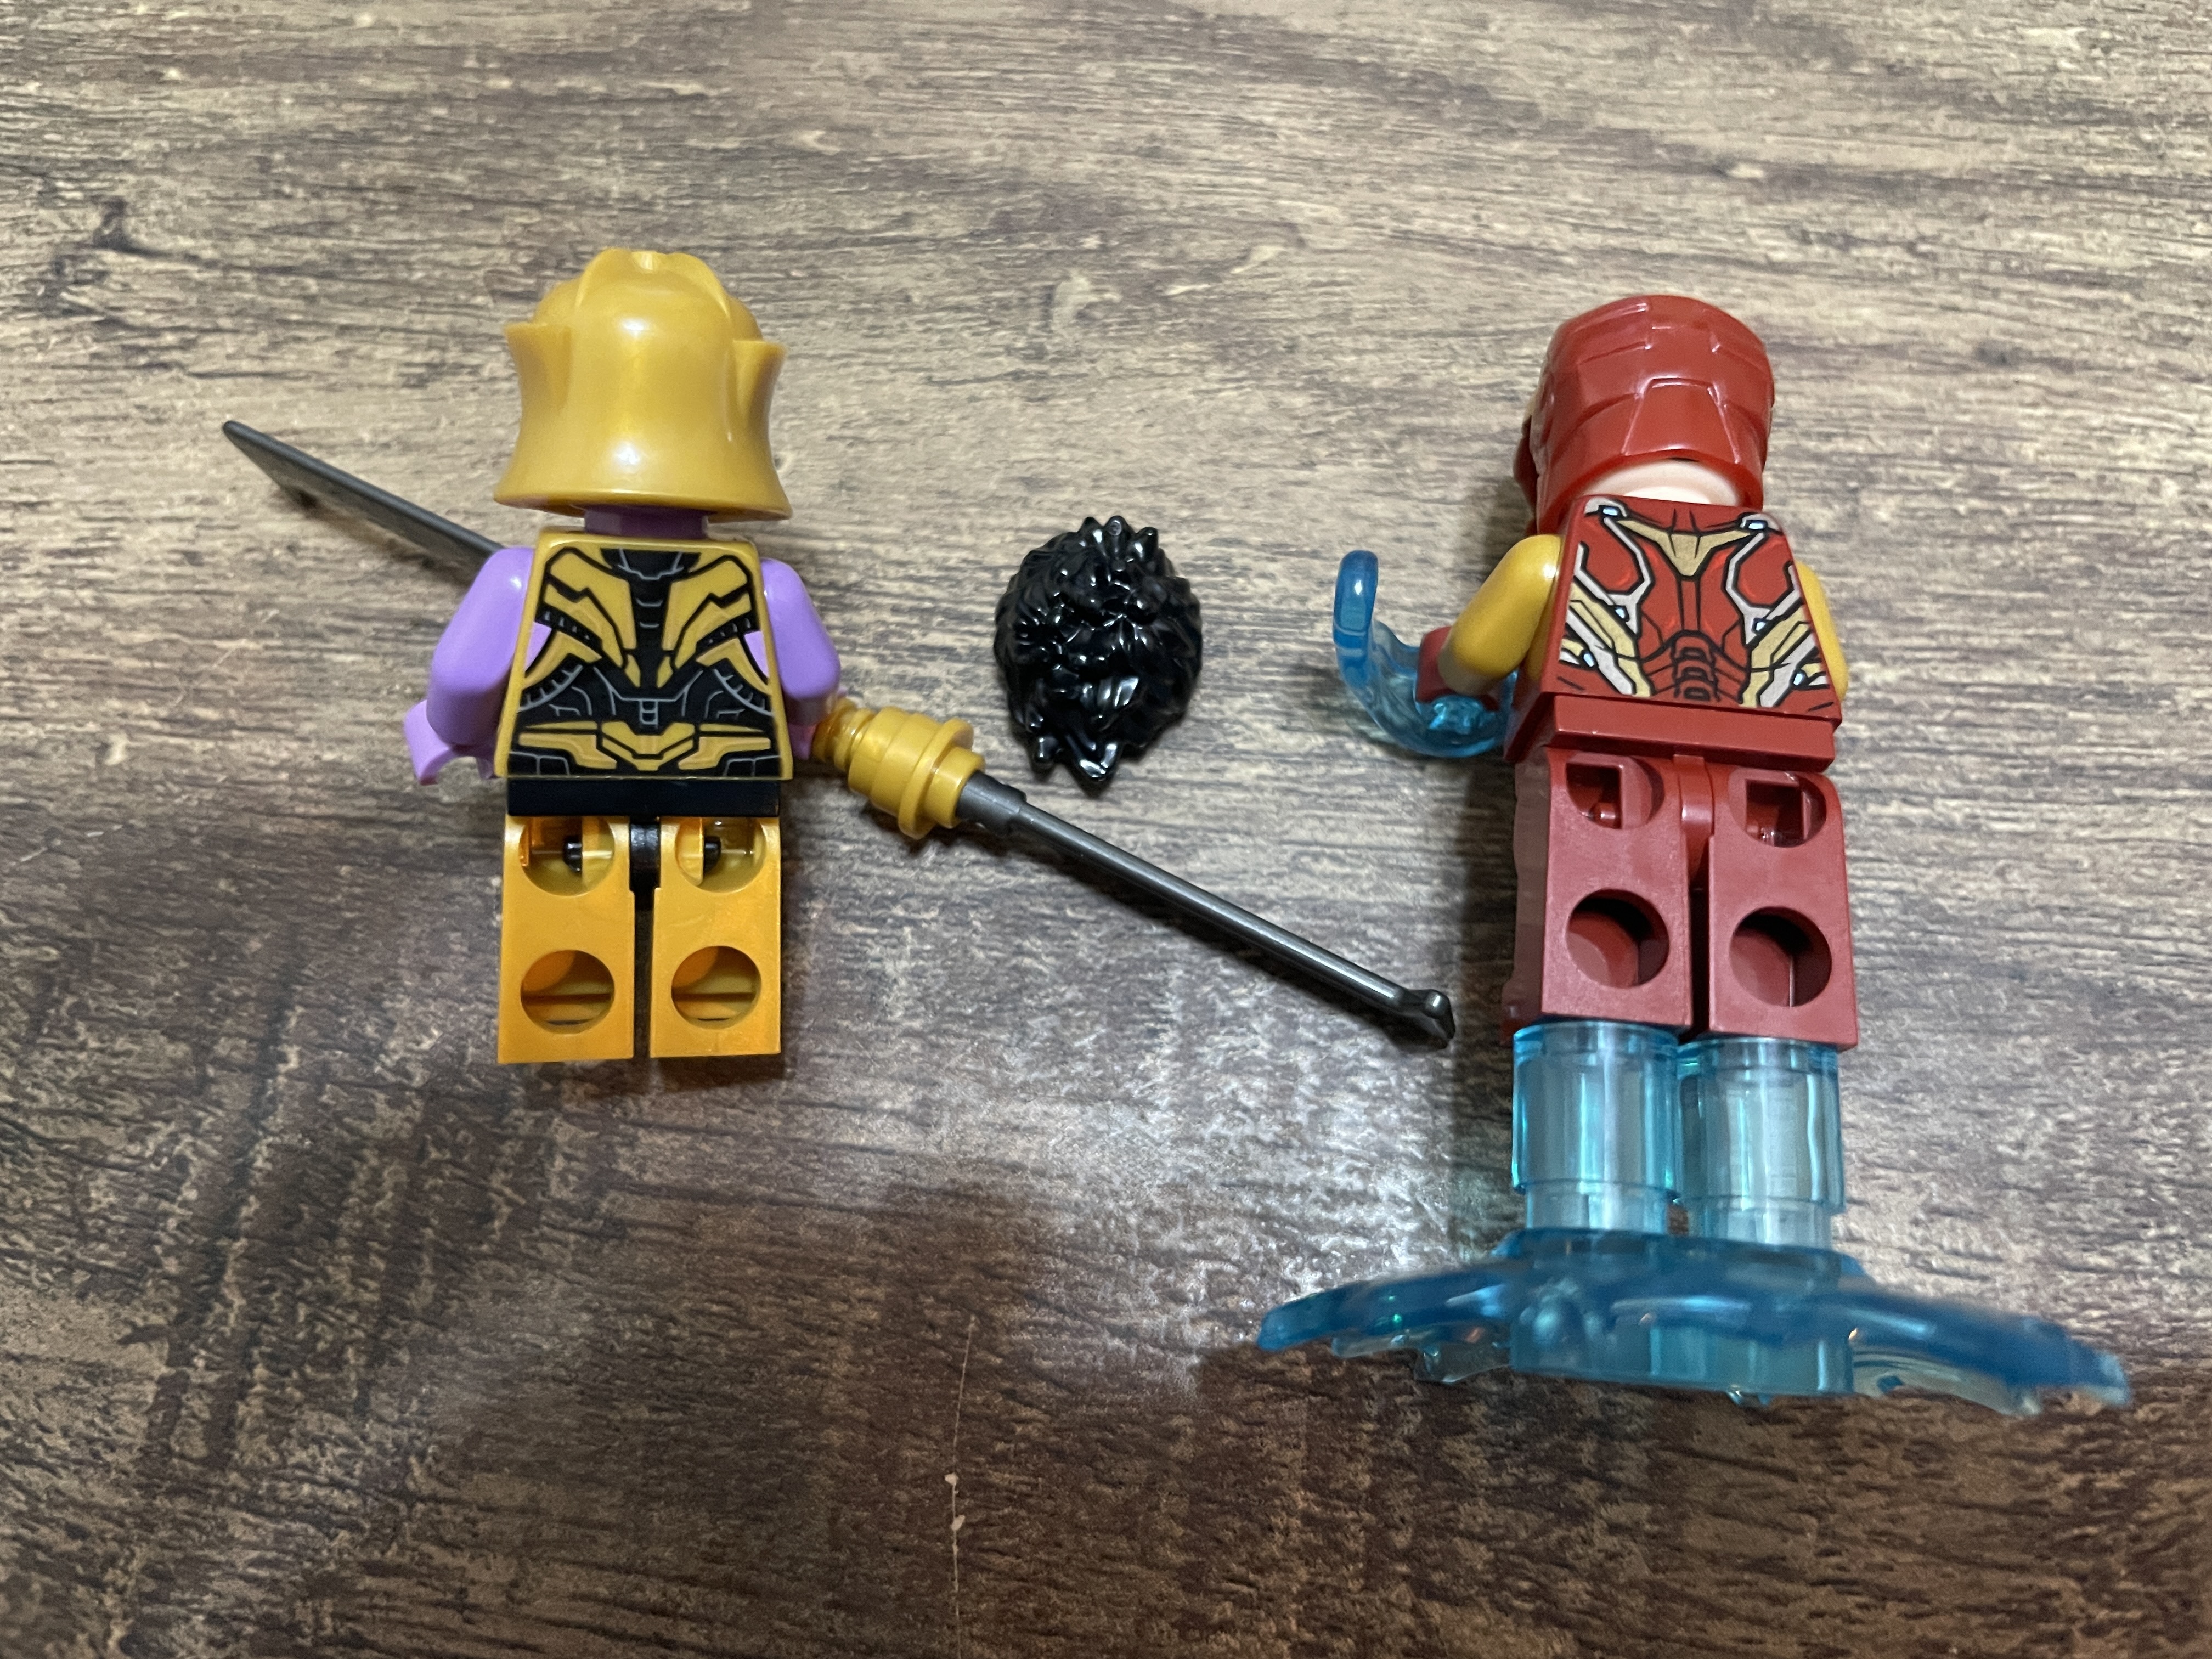
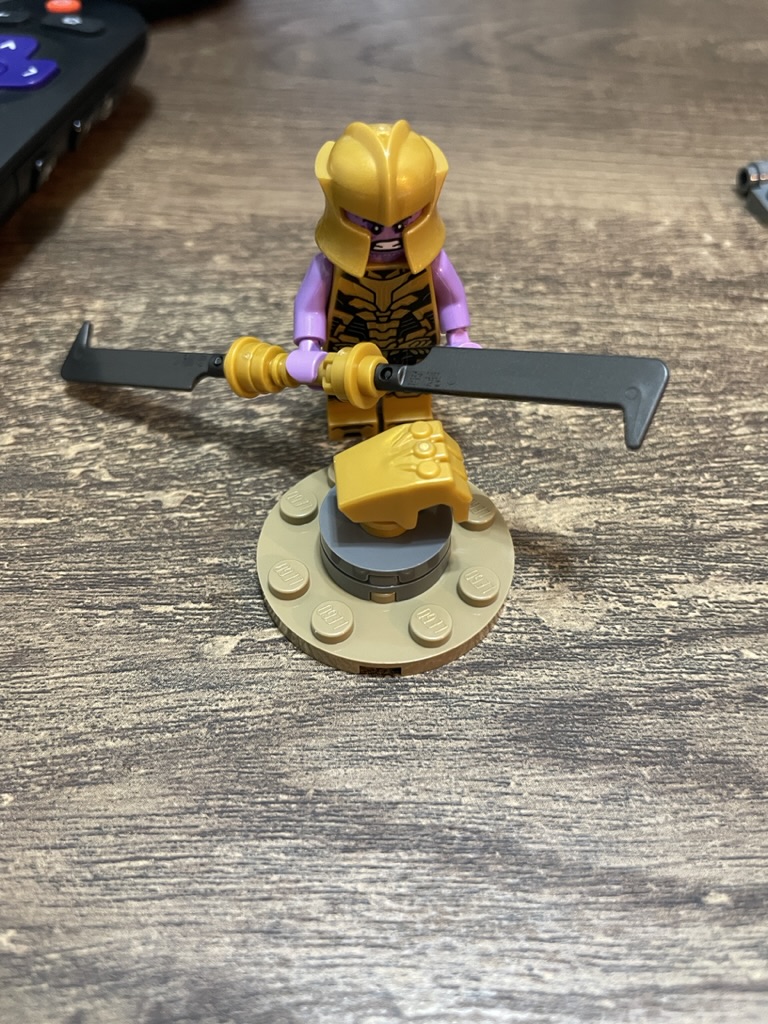
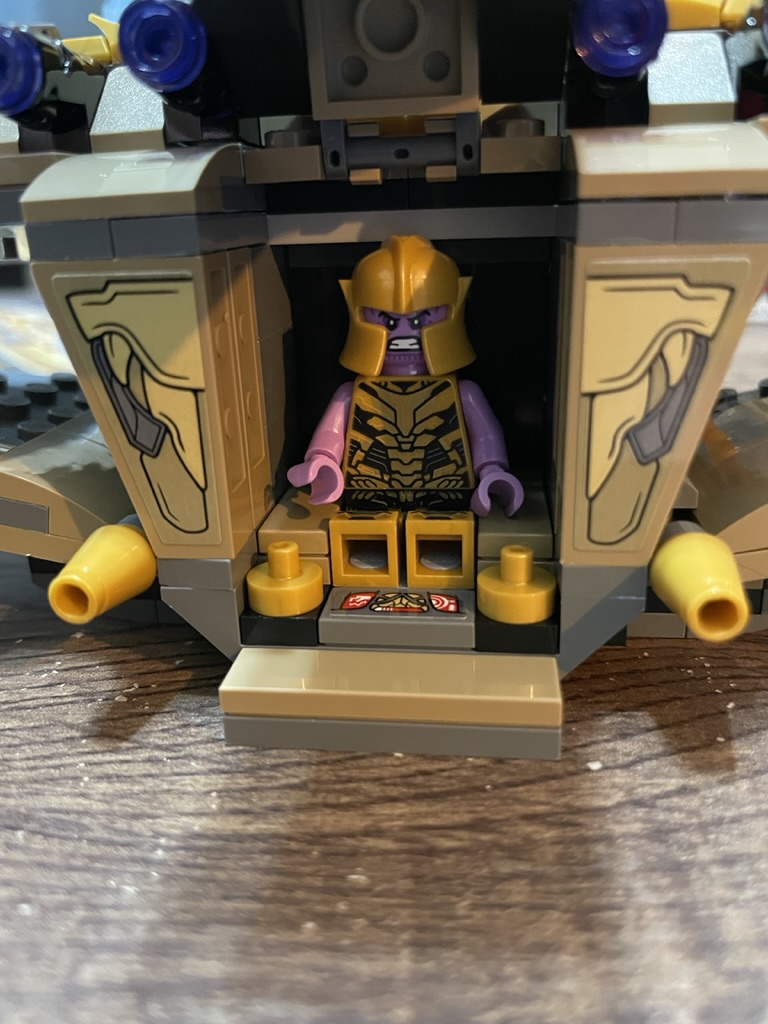
The build begins with two minifigures, one of which (Thanos) is unique to this set. Both Iron Man and Thanos have gorgeous torsos and leg printing. Thanos comes with his signature helmet, double-edged sword, and a mini-build with his gauntlet. Iron Man comes with Tony Stark’s black hair and blue blasters to configure the figure however you like. You get the same version of Iron Man as in the set Avengers: Endgame Final battle. Some collectors will get this set solely for the minifigures; these do not disappoint.
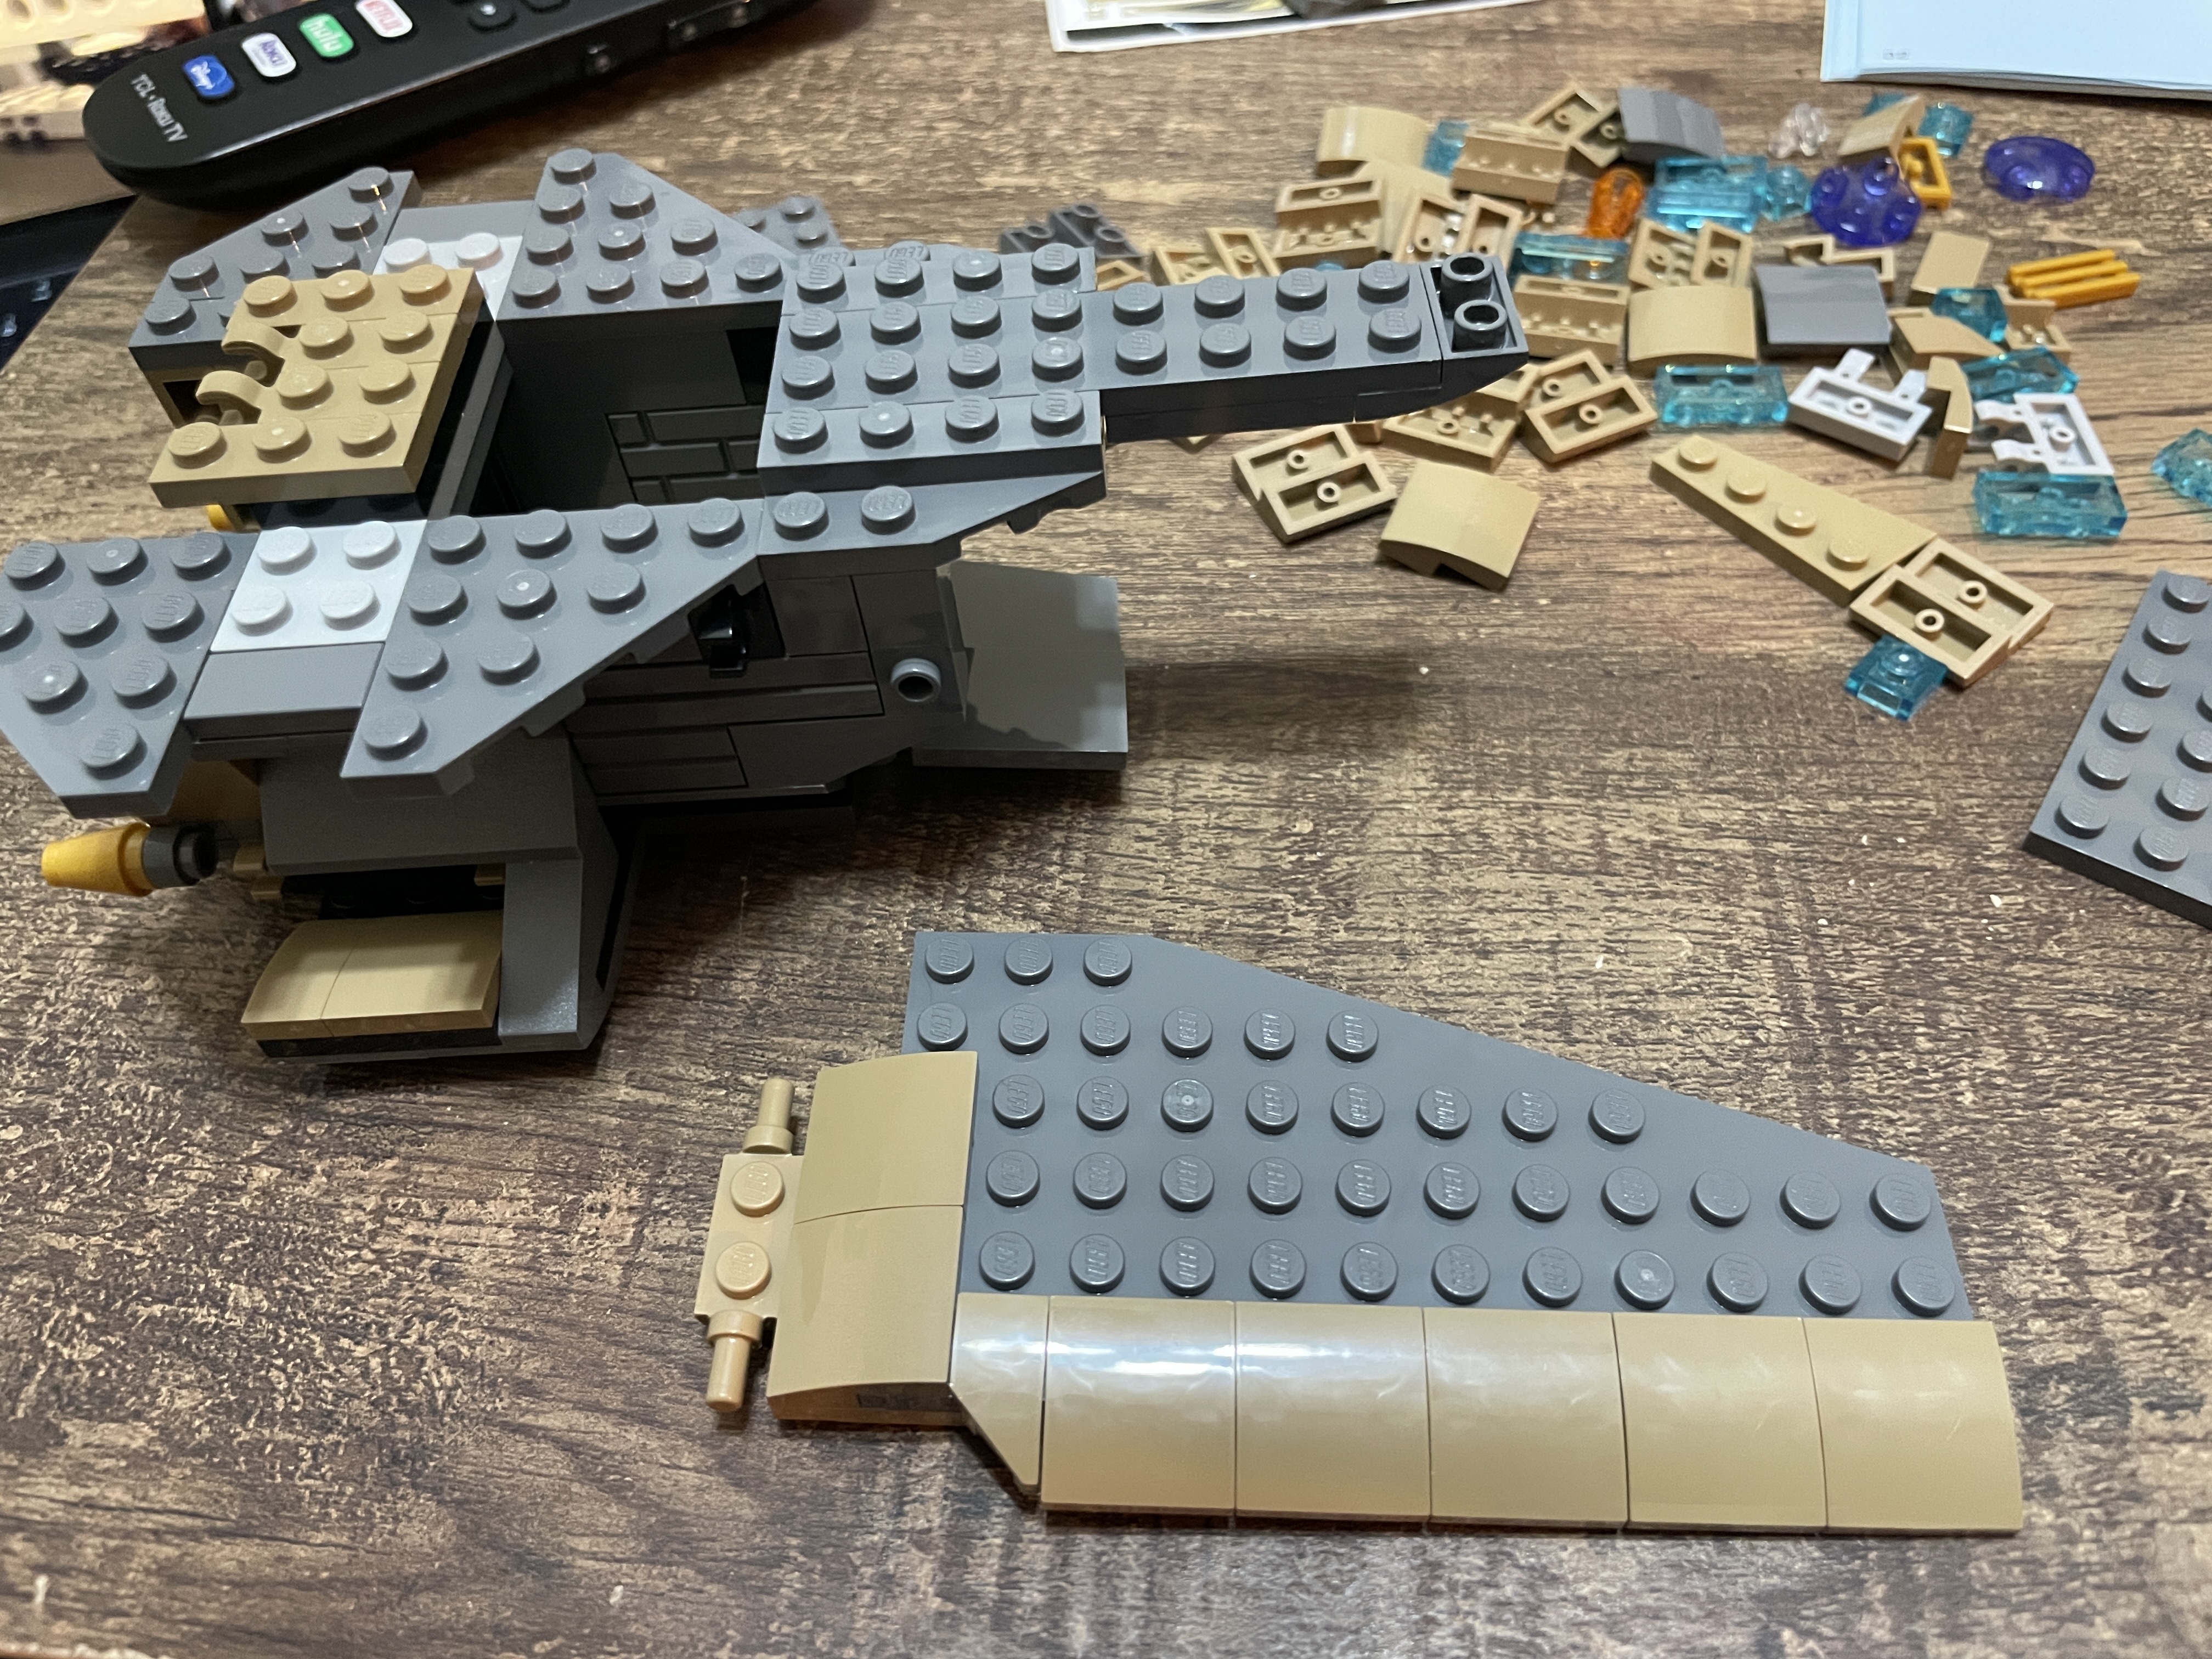
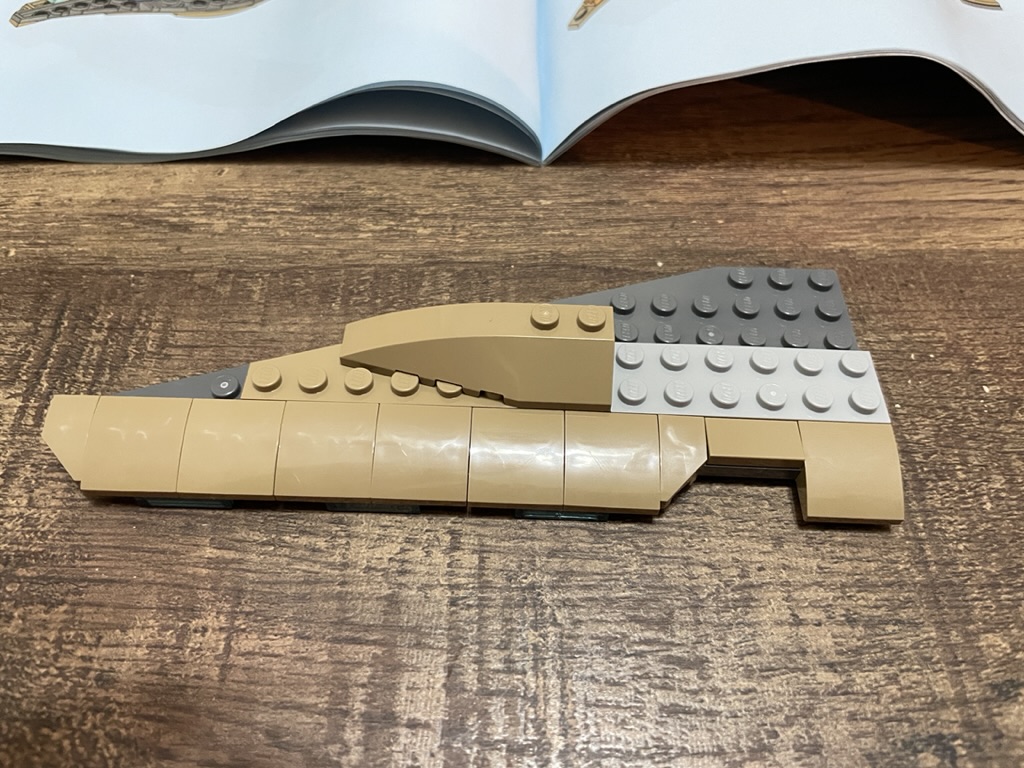
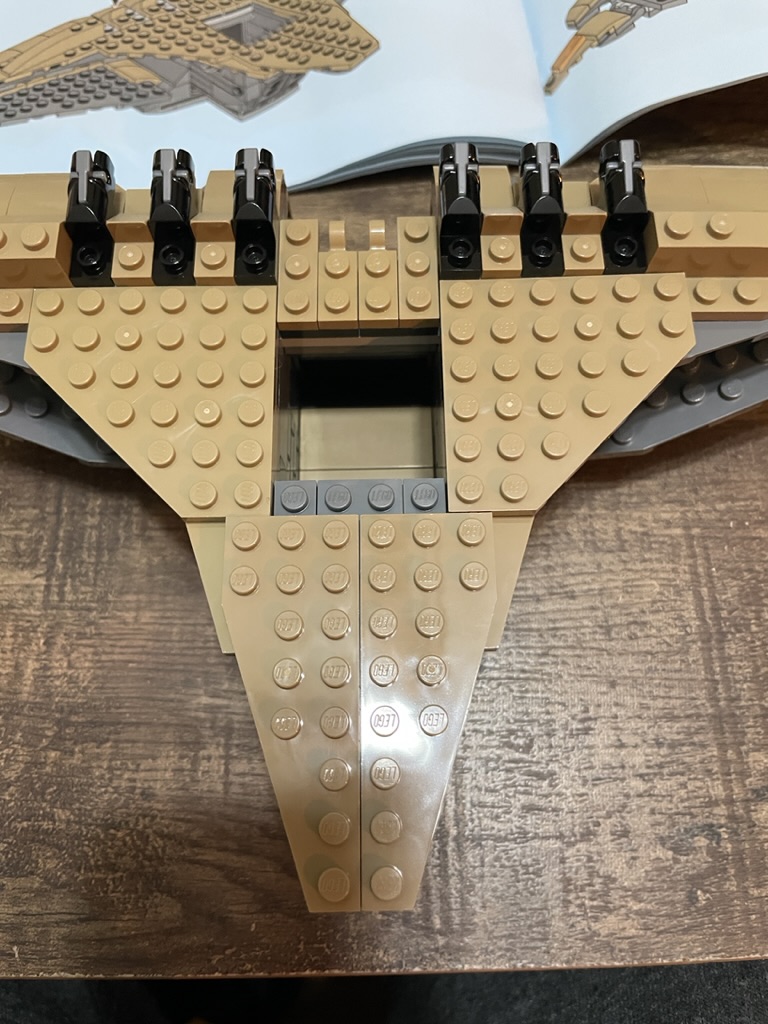
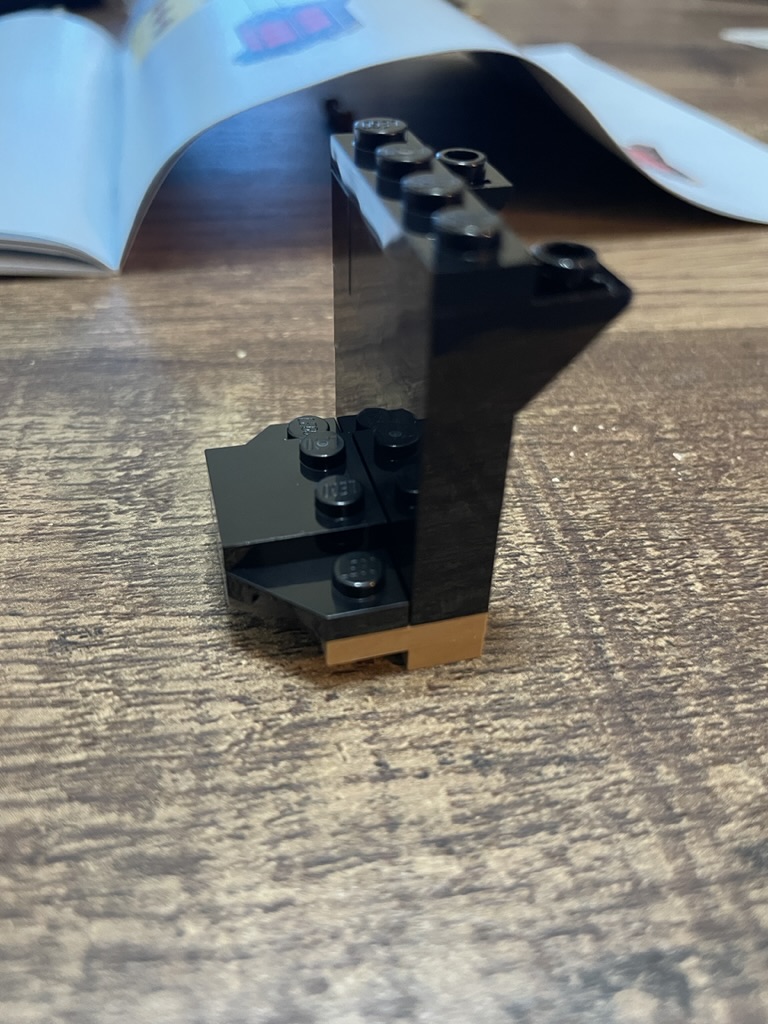
Stage one starts with the base of the ship with the simple placing of grey and black plate to generate the outline of the ship’s frame. Placing a modified 4×6 plate at the rear constructs the shell of the cargo bay while slopes and tile begin the formation of the wings. At the front, a sticker element creates the controls, while plate, tile, and modified slopes produce the boundaries of the cockpit. A blue seat – the only one on the spacecraft – is encased with tan tile and grey plate. The cargo bay is also covered in tan tile, with two clips placed at the rear.
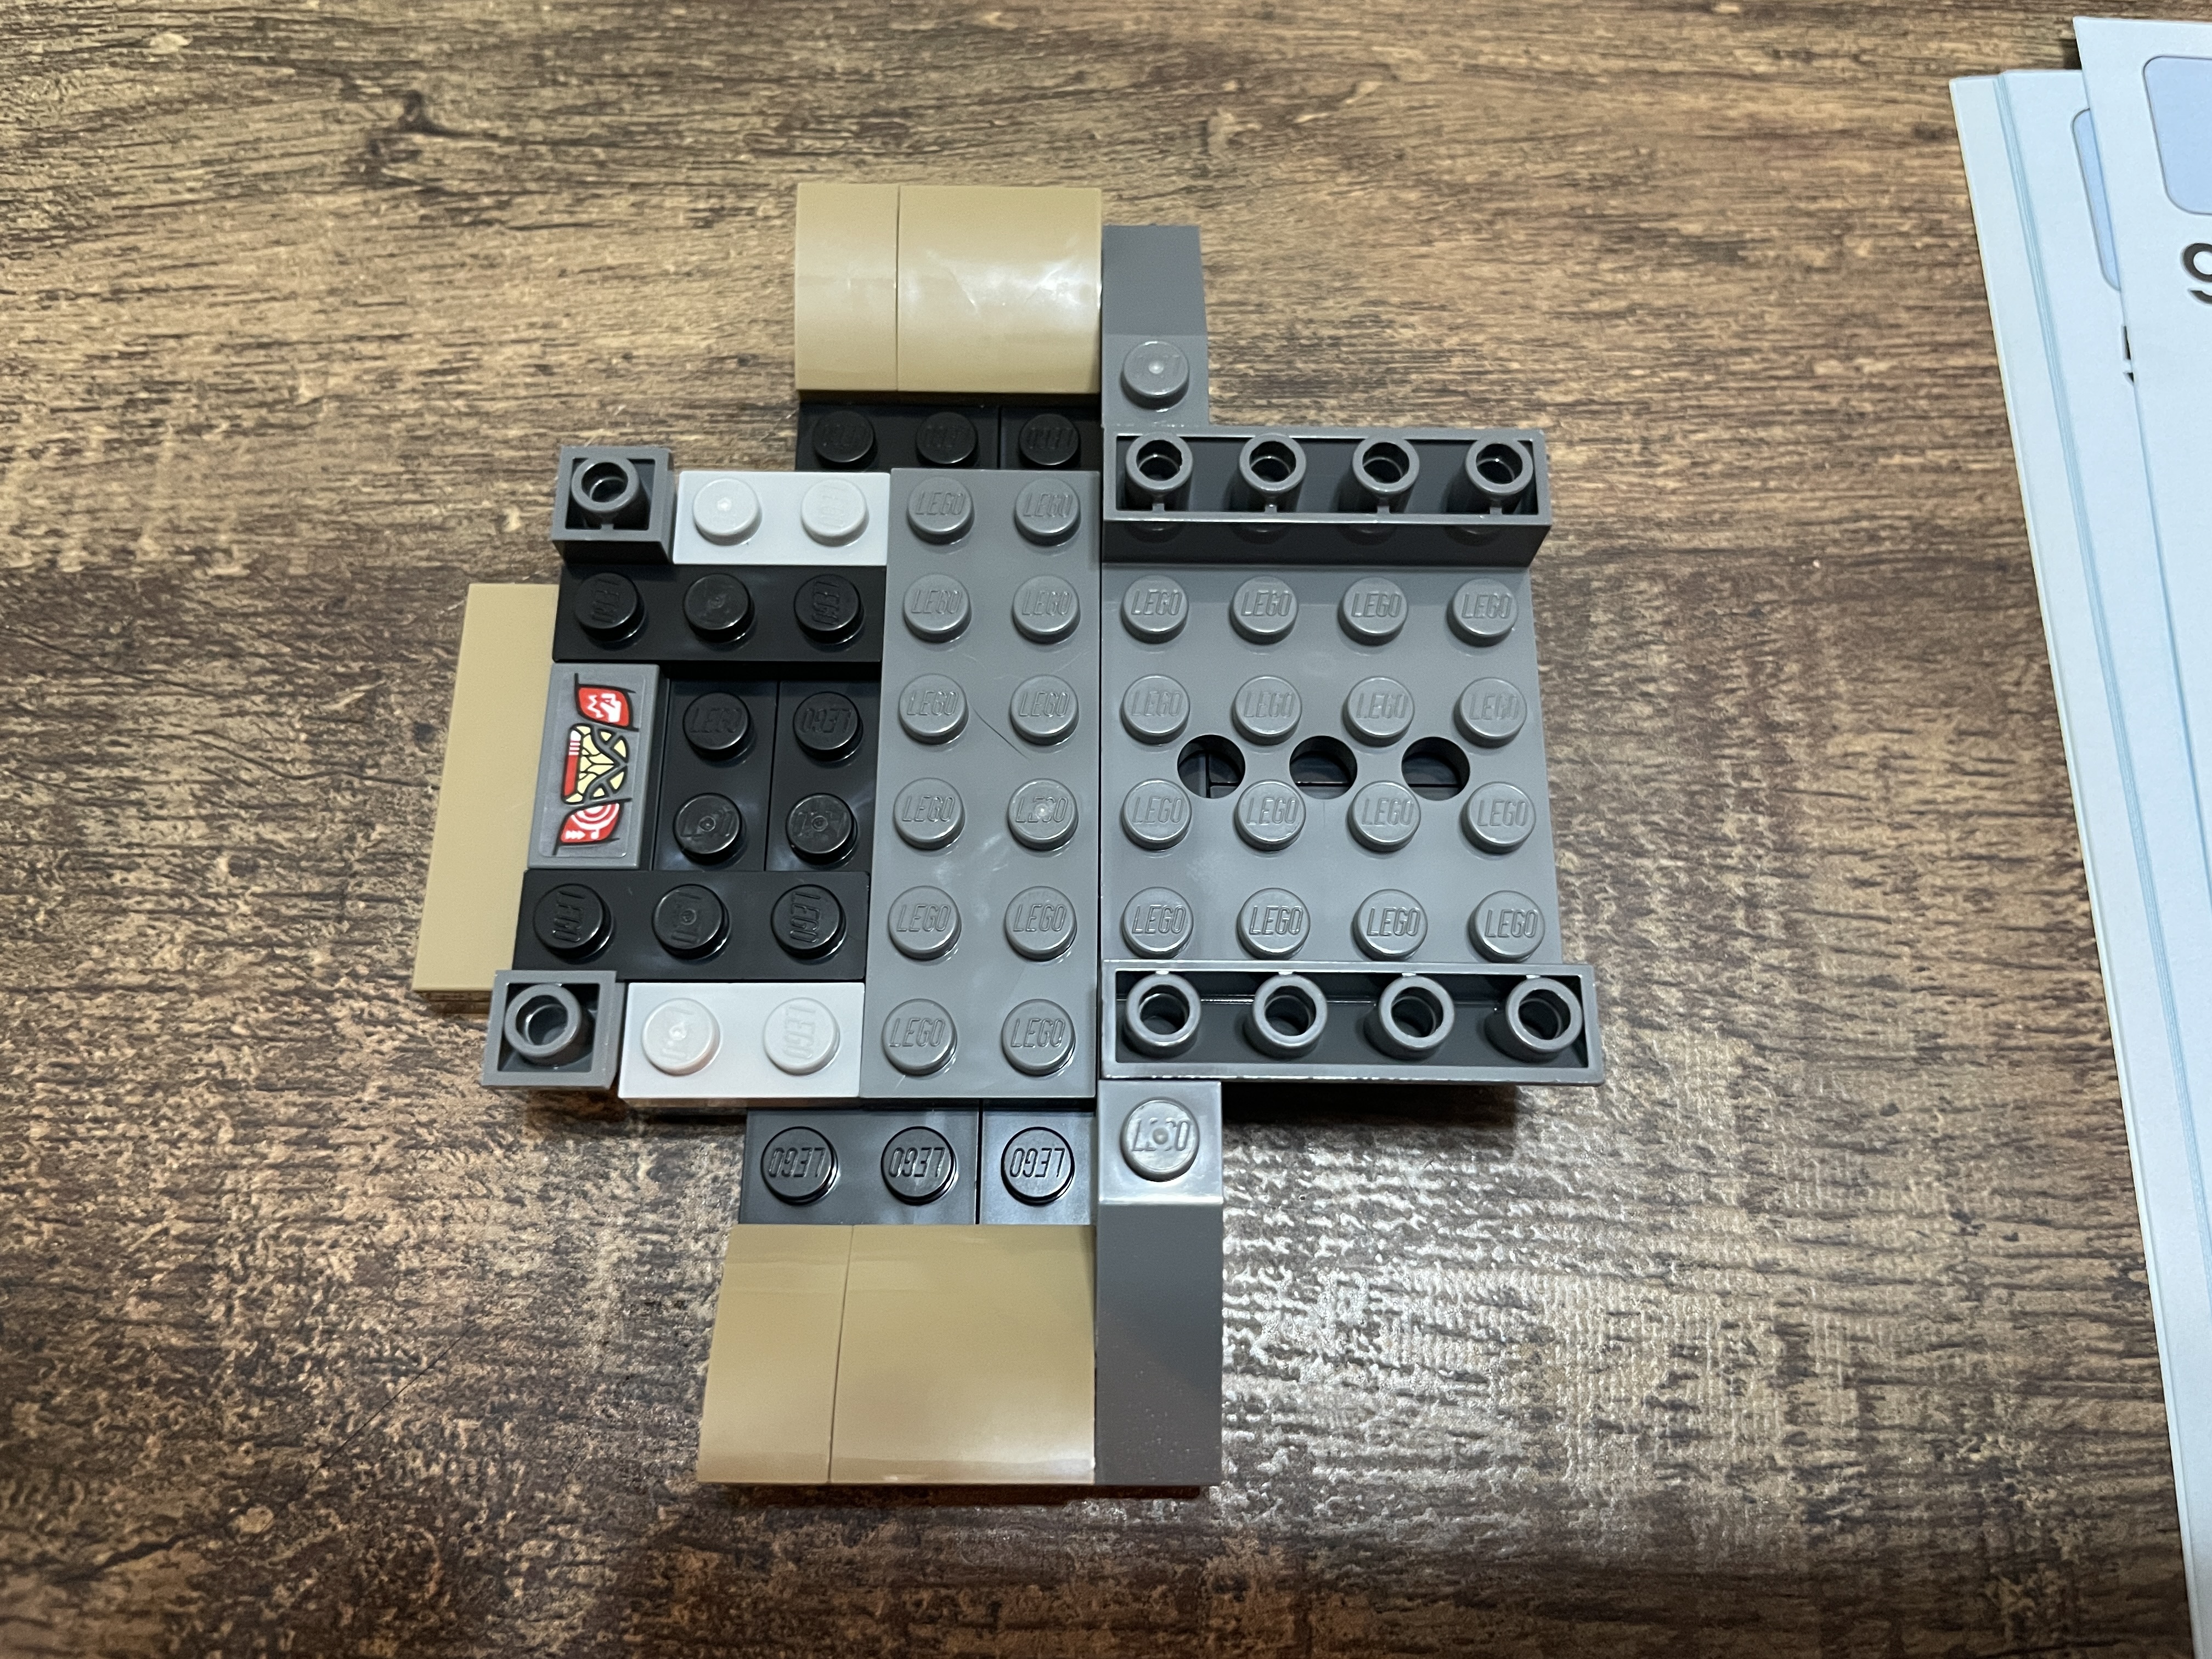
With the aircraft’s foundations in place, 1x brick separates the two sections and generates height. The cargo bay has masonry tiles to give the back of the ship some texture. Gold cones are added with modified 1×1 tile to the front to act as guns. Black modified 1×1 bricks are placed at either side of the rear as clips. These are not used in the build but can be used to attach the minifigures to the ship when displaying the final product. More plate is added to the back of the vessel to support the roof, while tan inverted slopes are placed at either side of the cockpit.
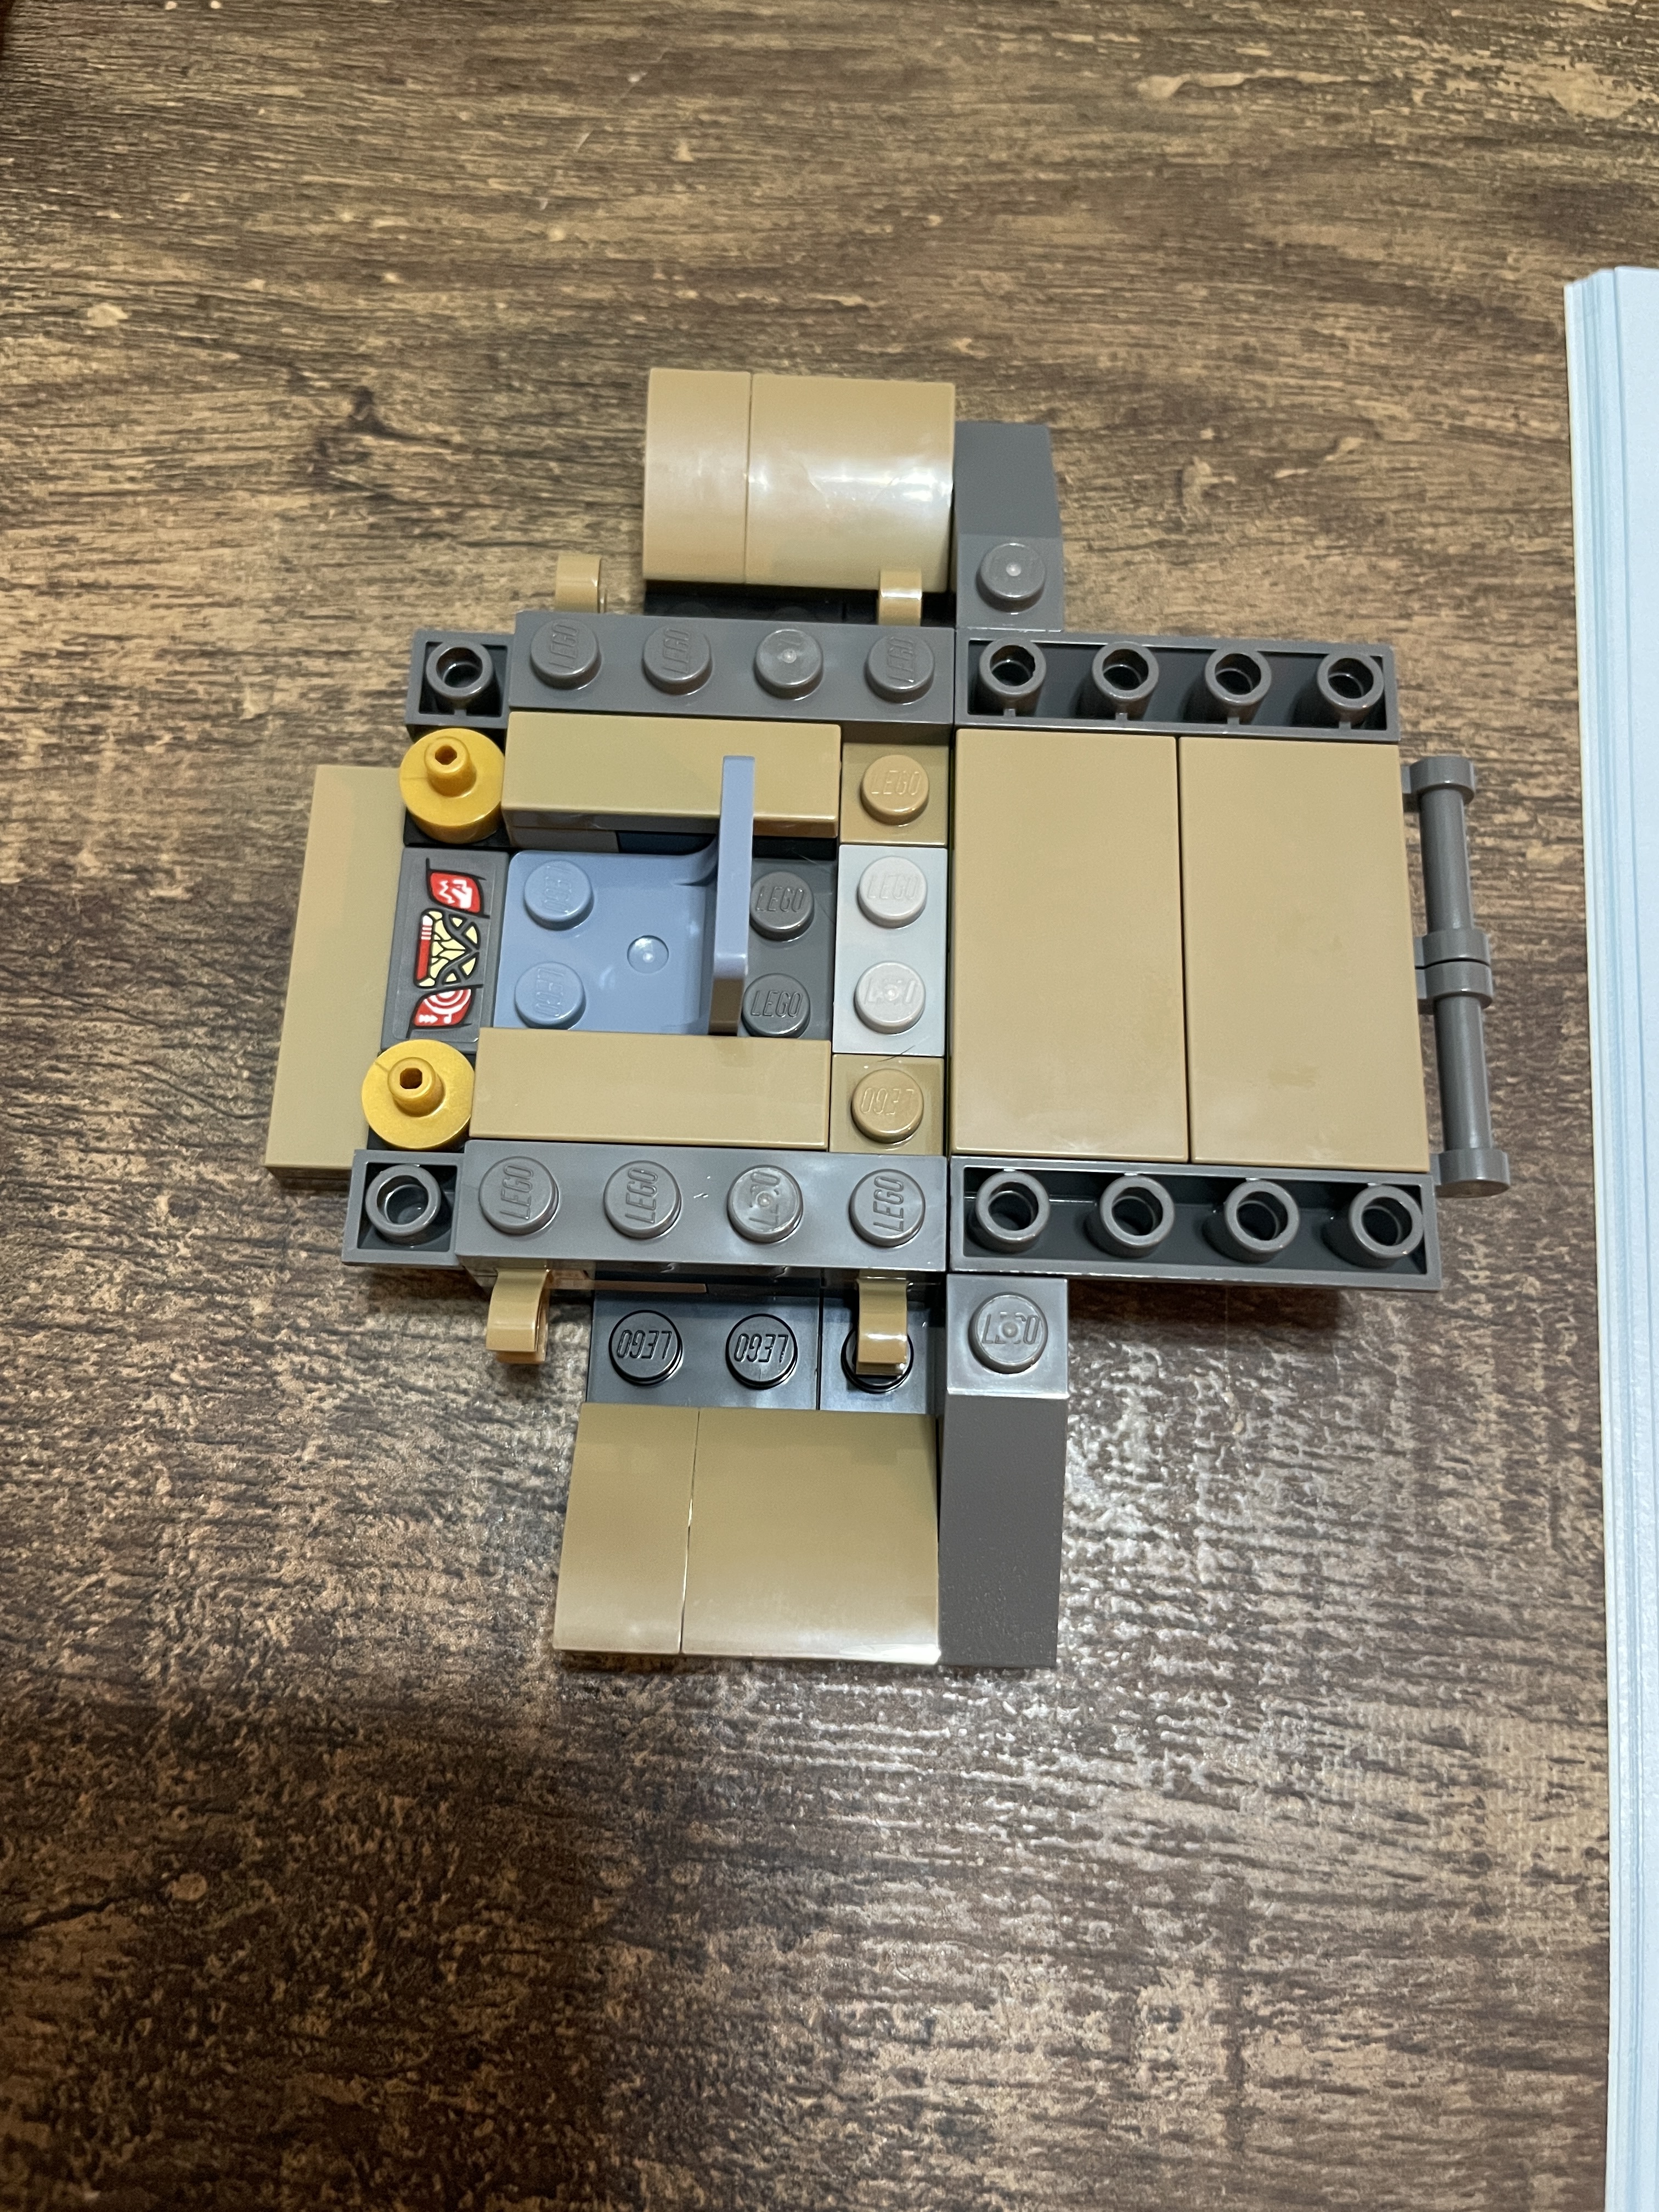
A second, stickered set of inverted slopes are placed at the front to give the ship’s exterior its desired texture and design. Positioning these was stressful, as they are large and need to be near perfectly aligned for the craft to look good once complete. Additional plate is affixed to solidify the underlying brick, and slopes create the craft’s structure. From the side, you can appreciate the height of the chassis and the modified 2×4 modified tile clipped to the rear as a cargo bay door.
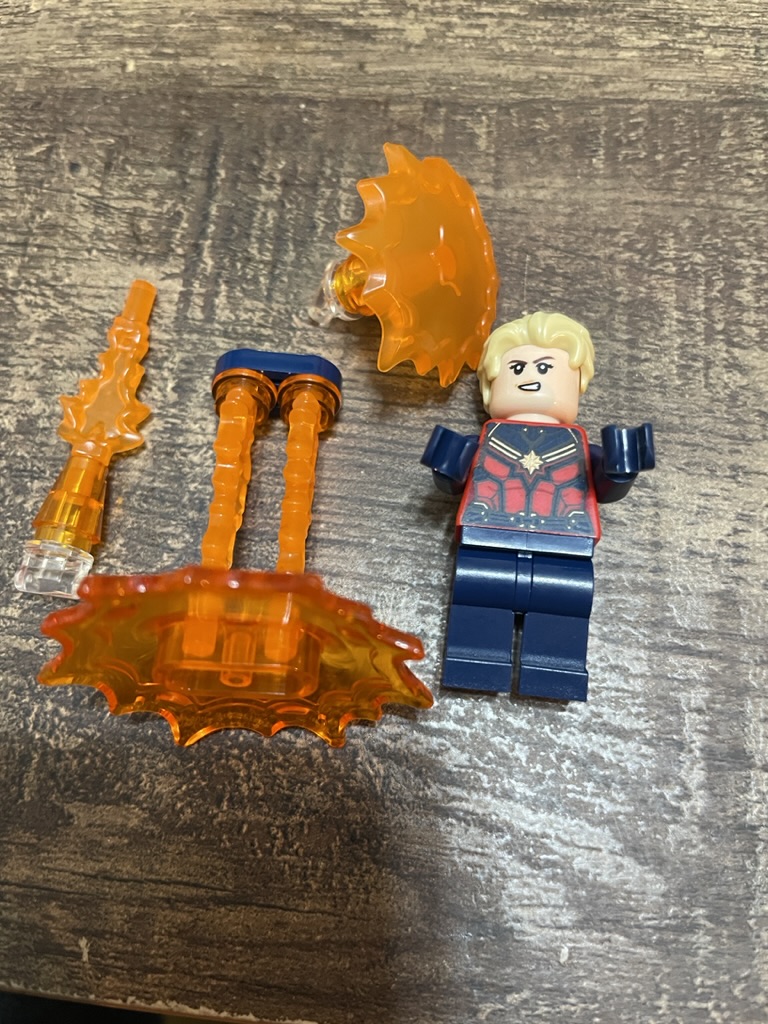
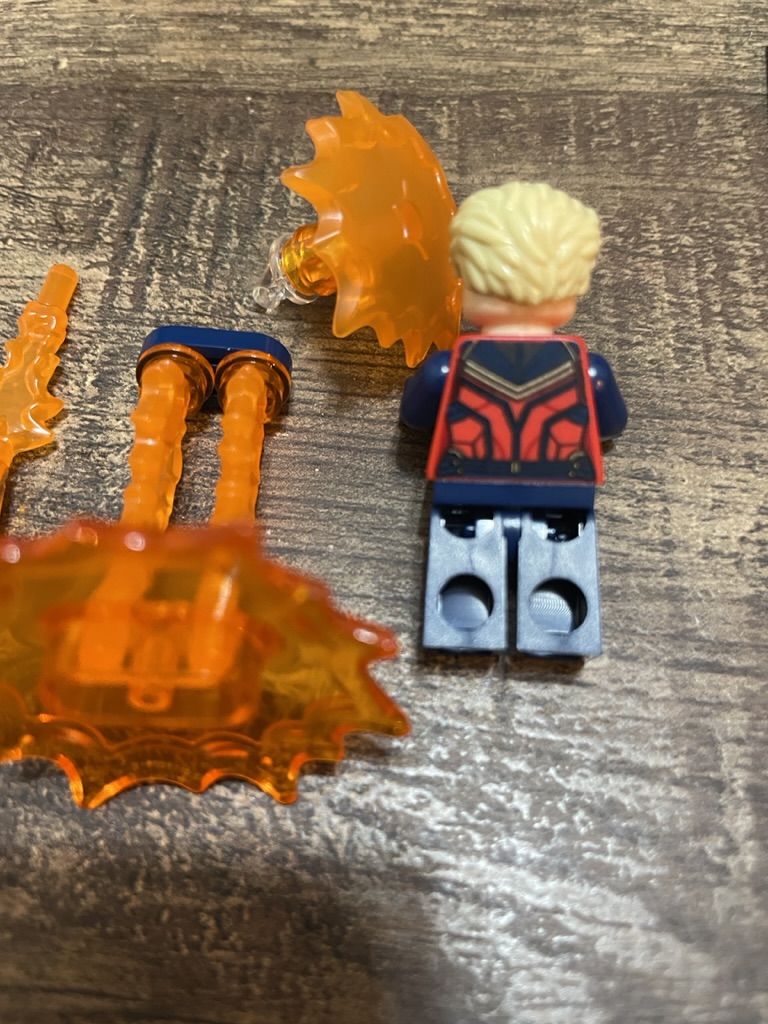
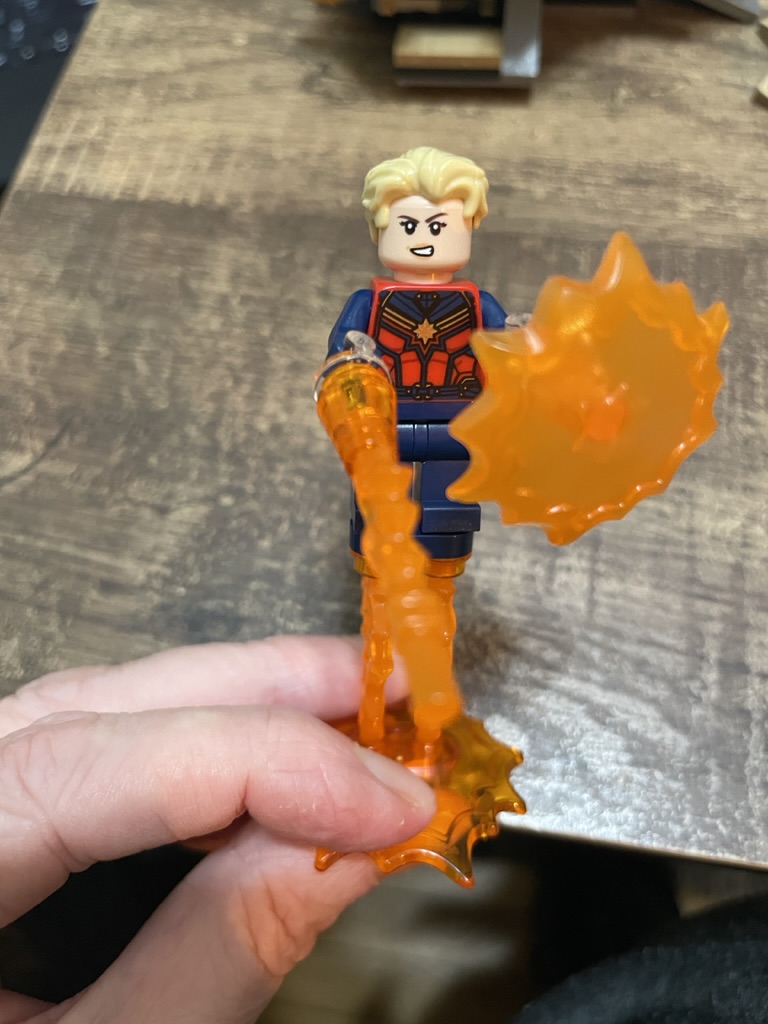
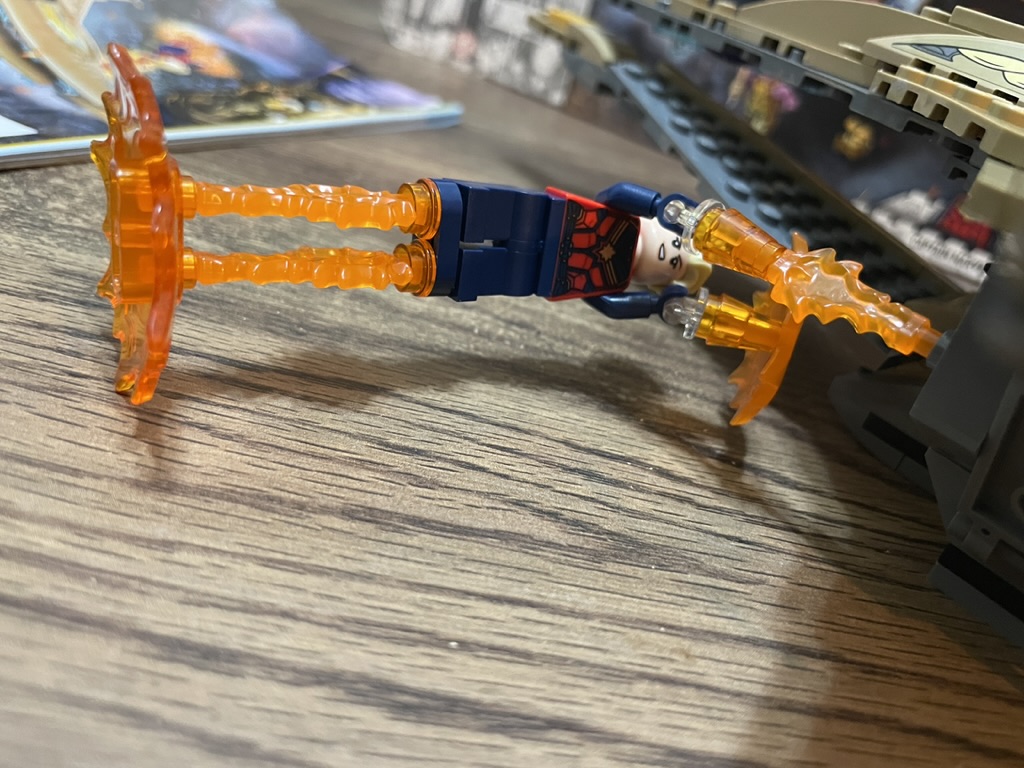
Stage two begins with making the final minifigure for this set, Captain Marvel. While she is unique to this set, she does not come with any leg printing but does have an excellent torso design that matches what we saw on screen. Additionally, her hair has been changed from previous minifigures to give the short haircut she donned in Endgame. Further, she comes with many orange blaster accessories, so when displaying Captain Marvel, she can blast the ship however you desire.
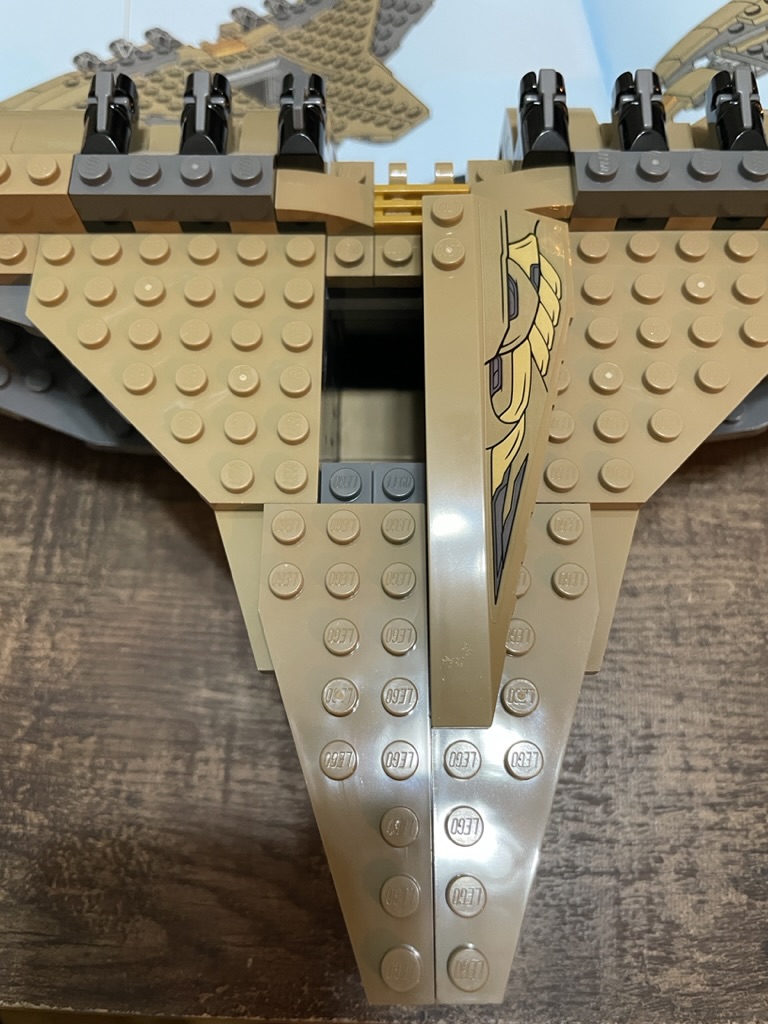
A little more tile is added to the main chassis before work begins on the aircraft’s wings. First, two modified tan plates sit above the cockpit, and additional plate is placed at the back to create a tail structure. It is finished off with an inverted slope.
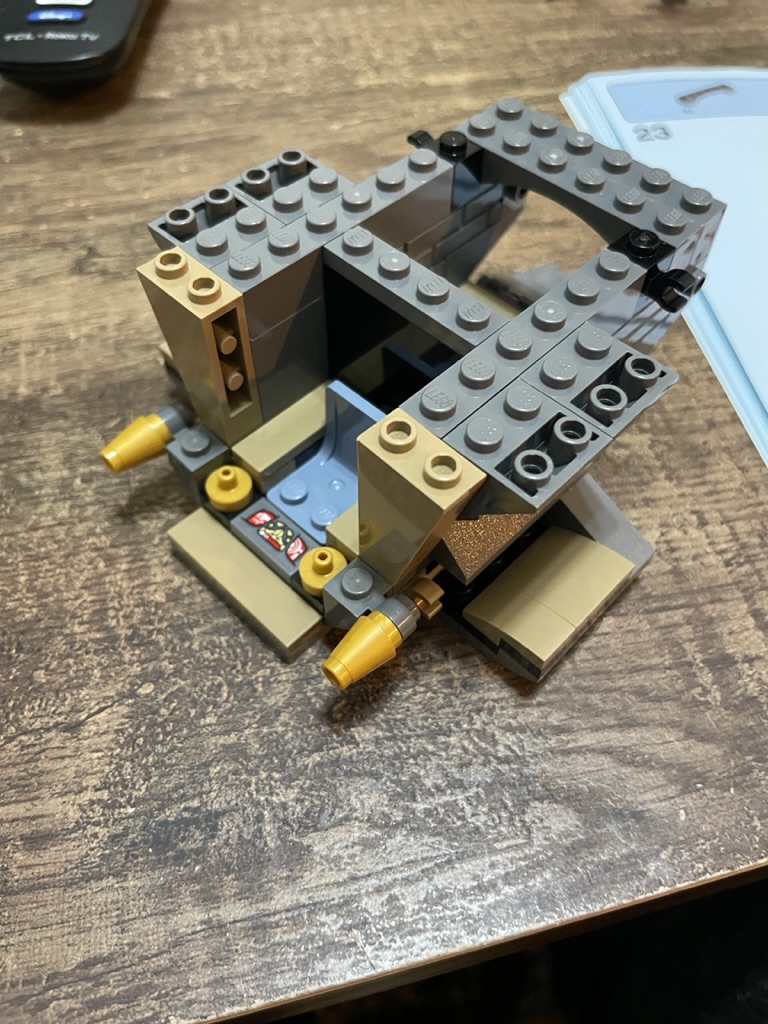
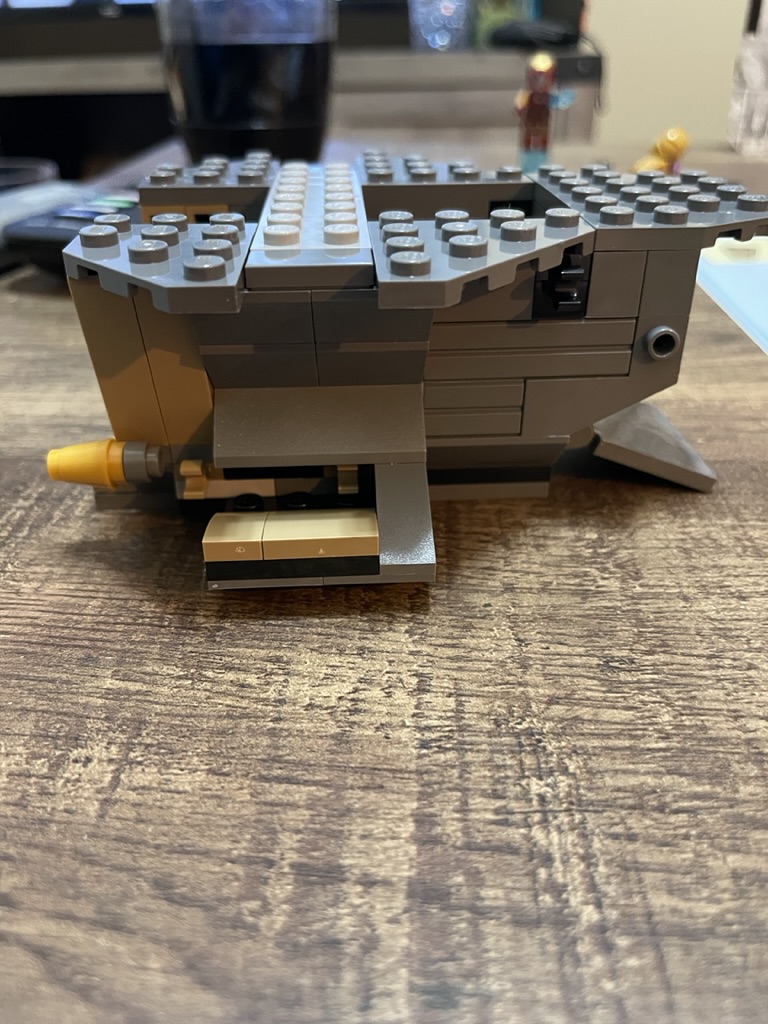
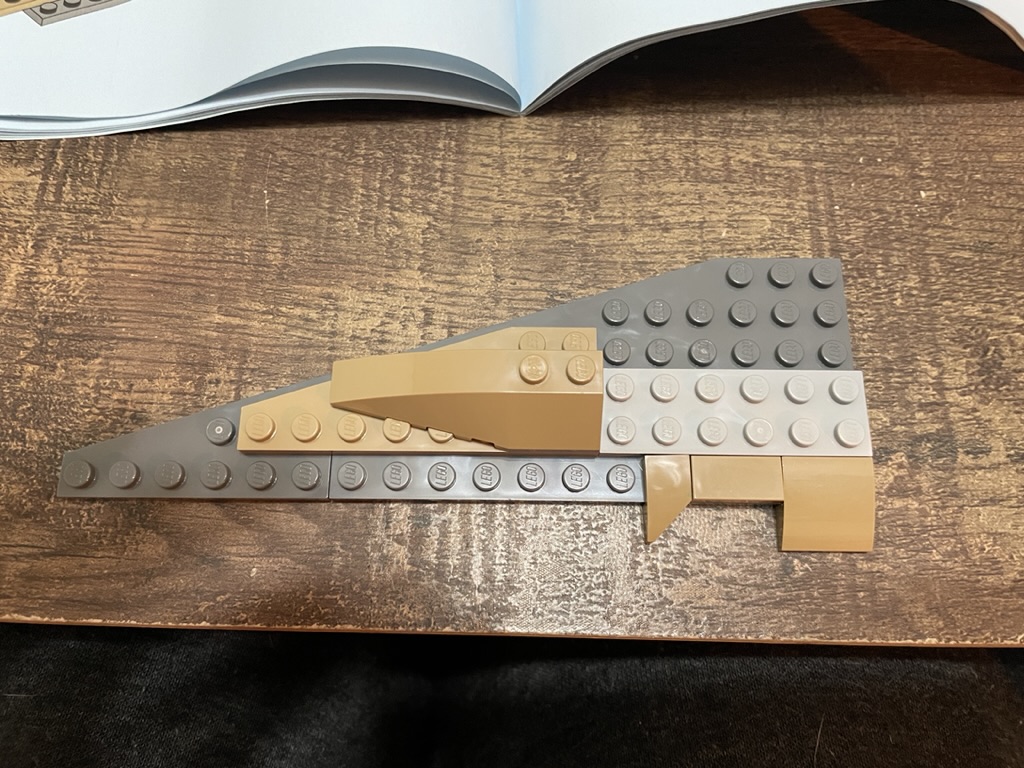
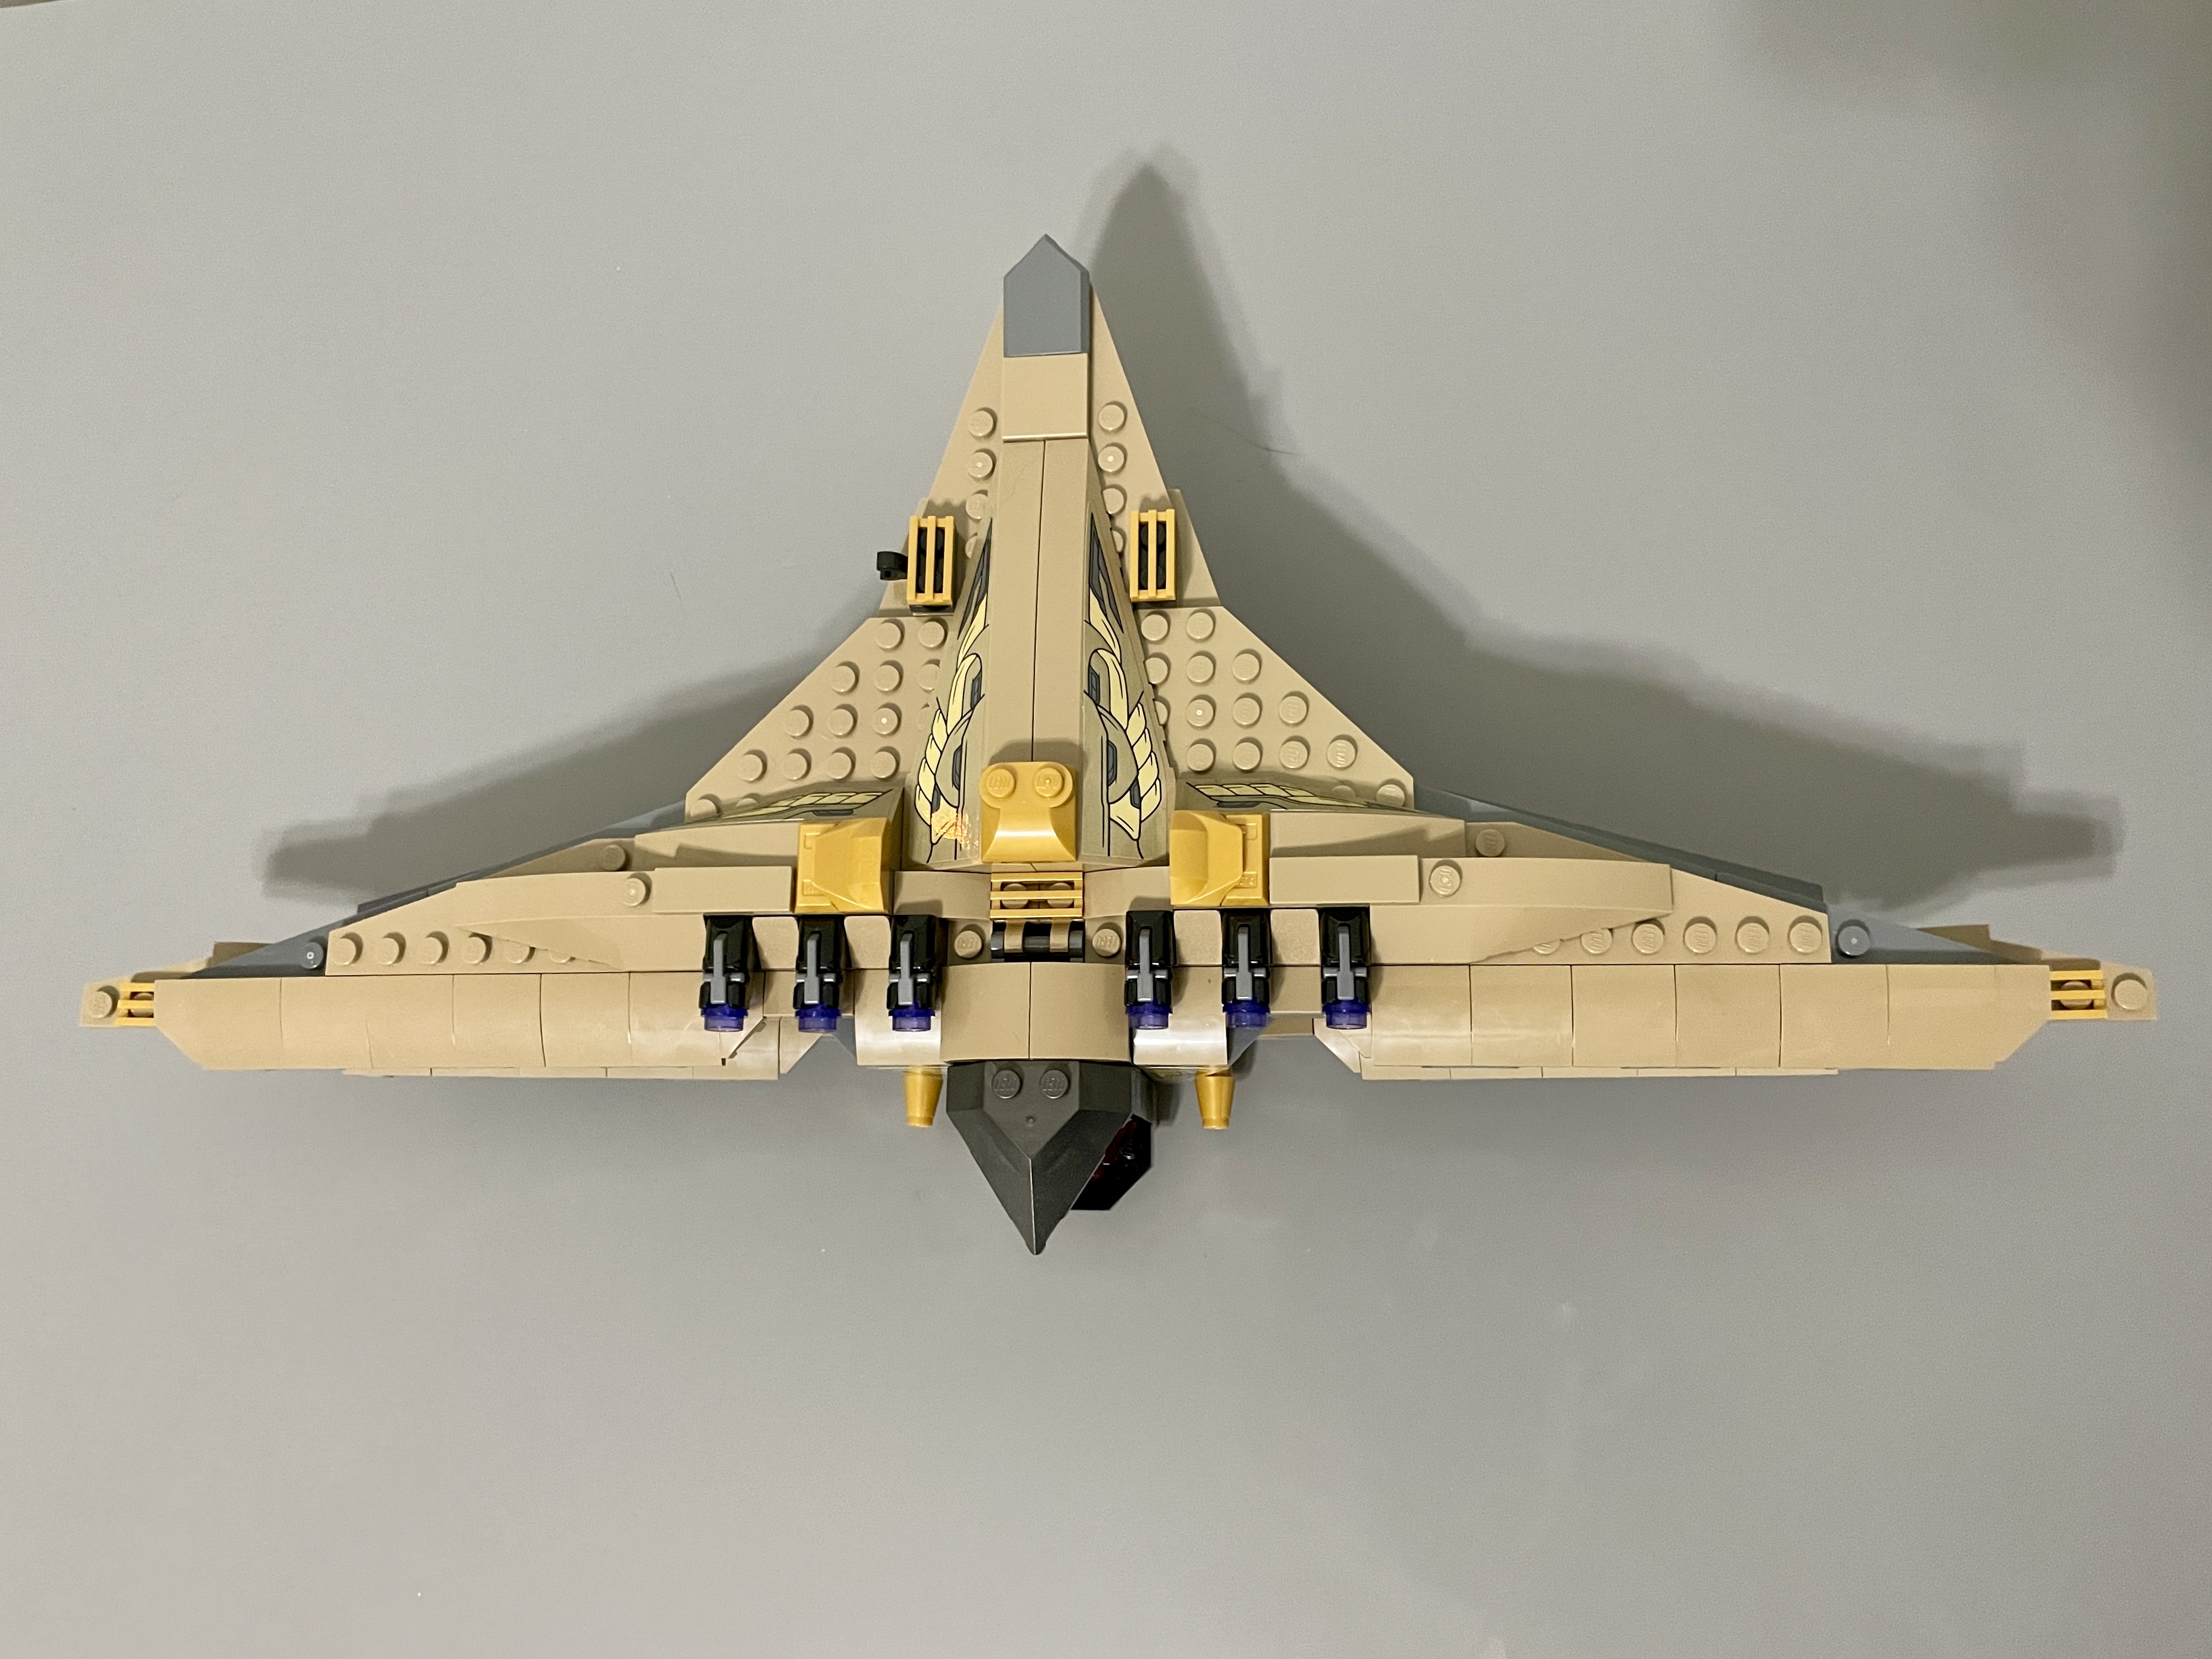
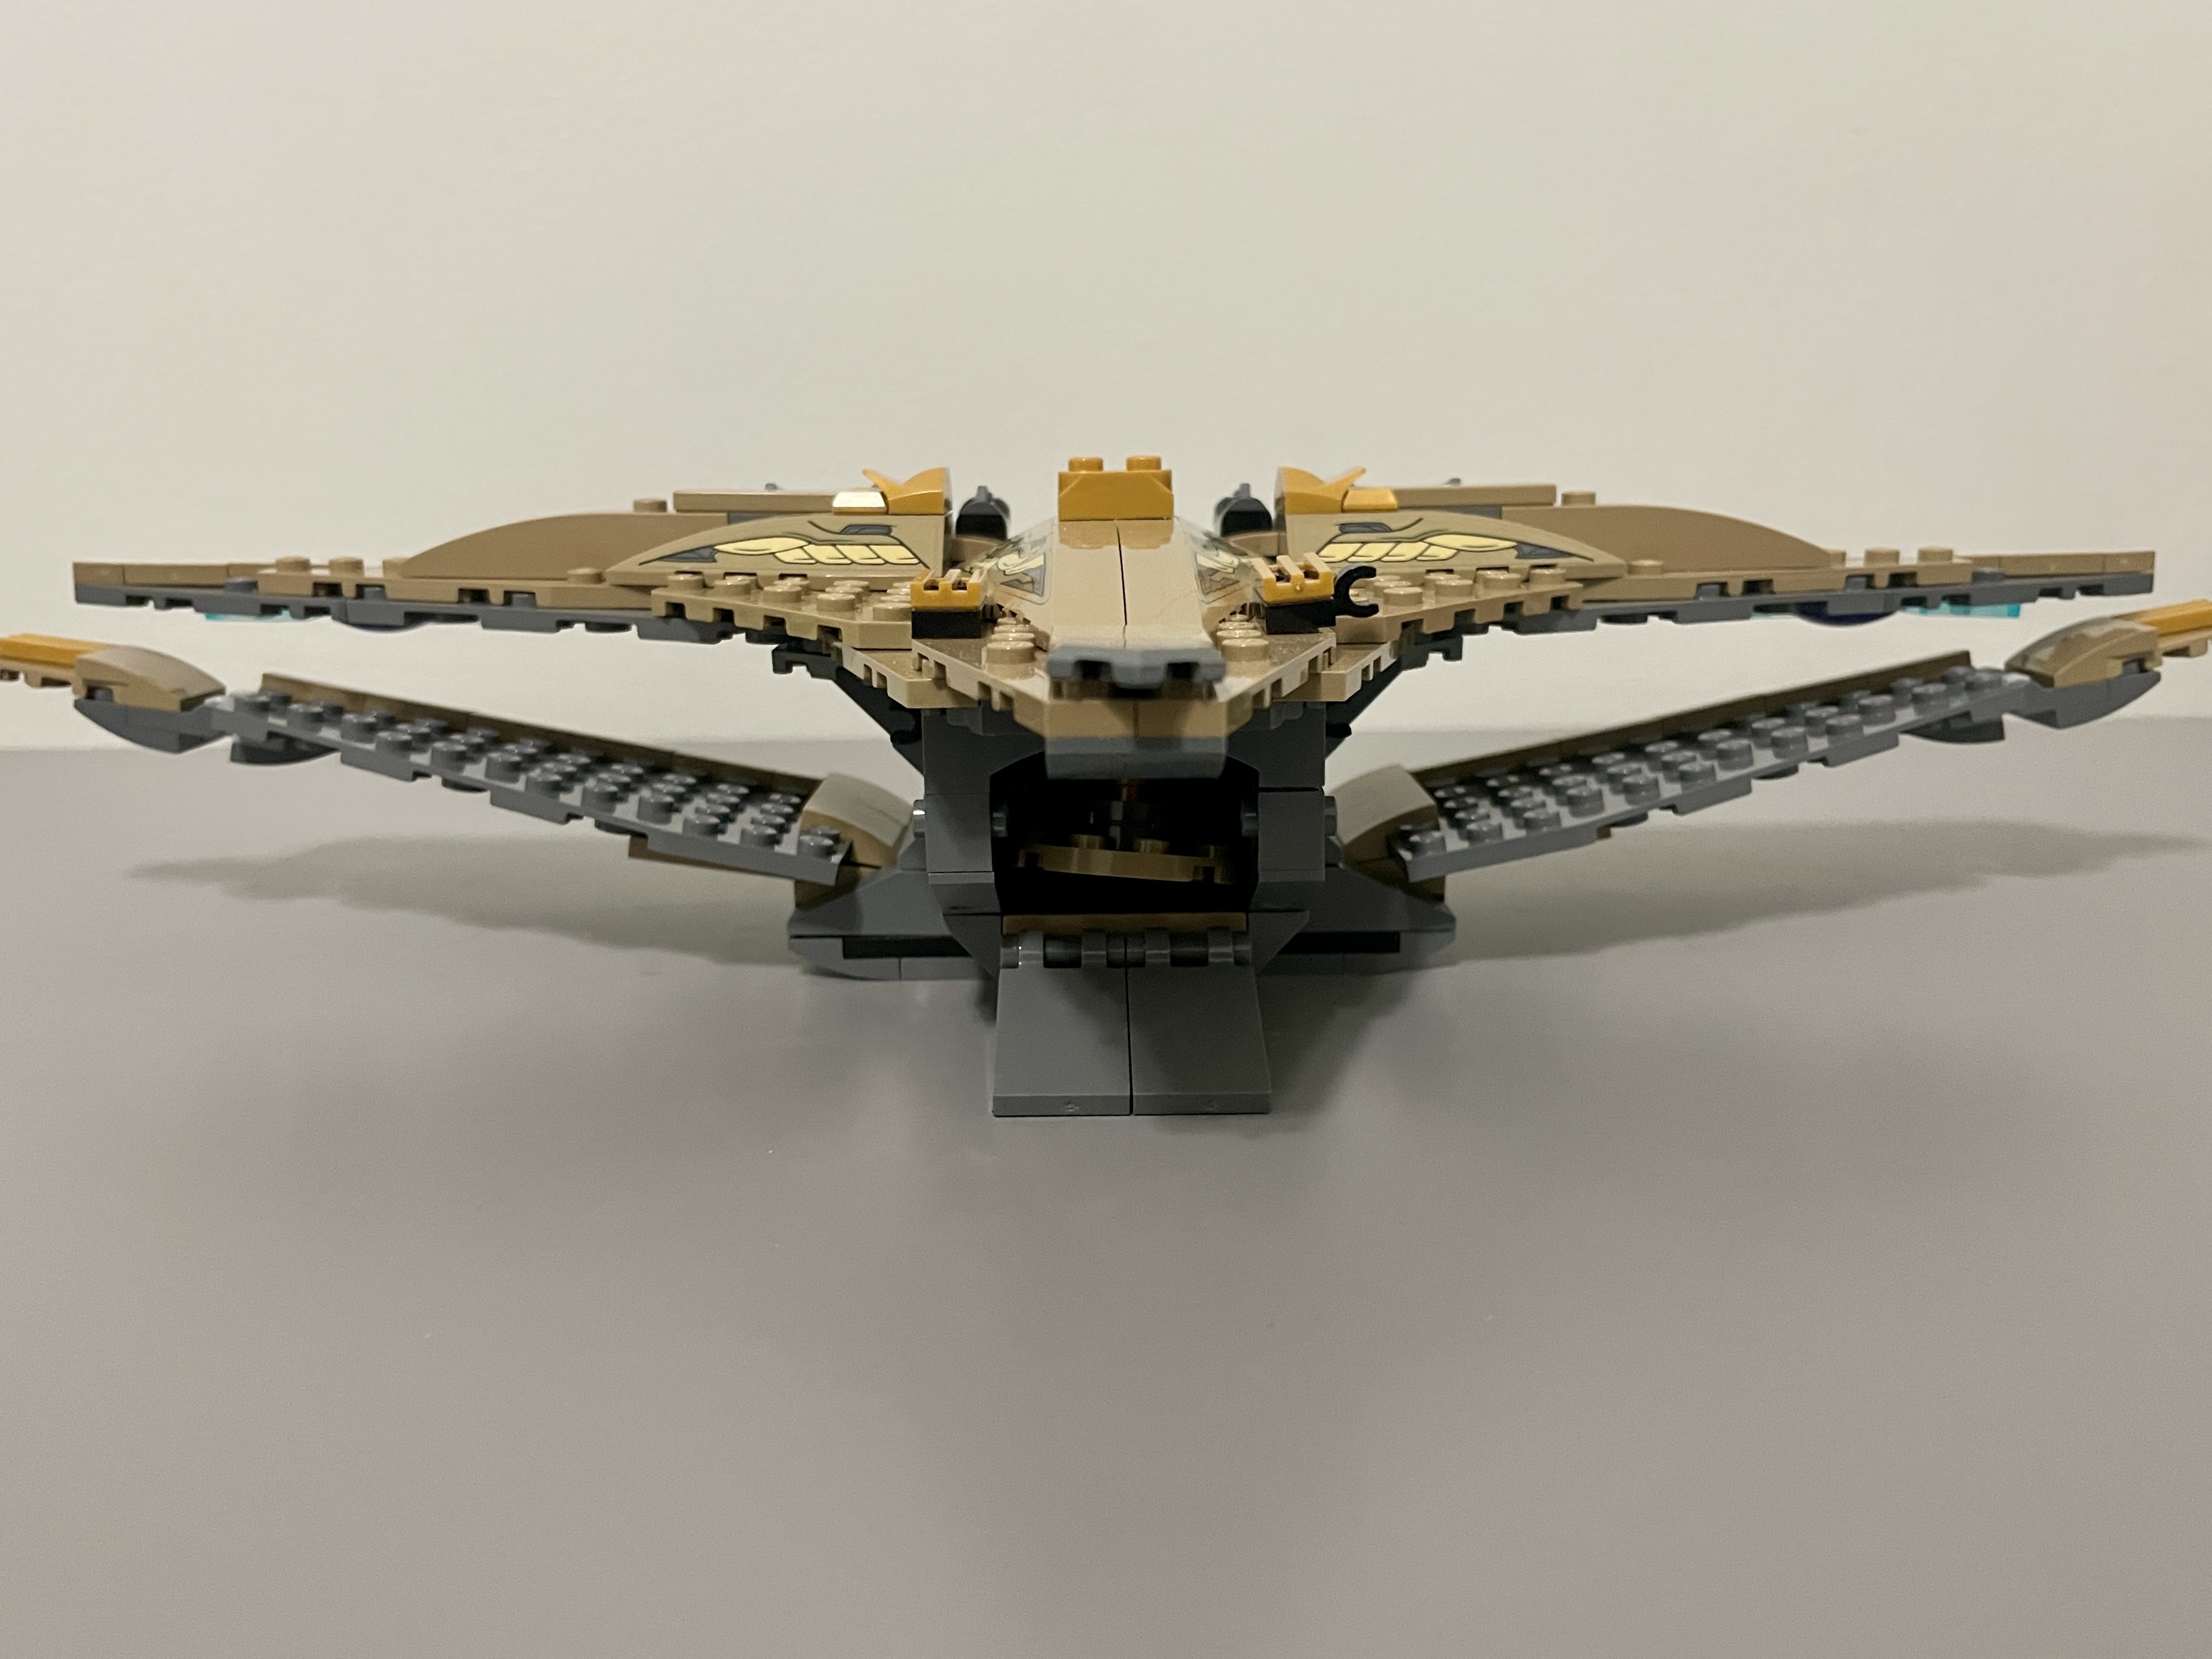
The wing is built around a single 6×12 triangle plate, with the long side covered in tan 2×2 slopes. This creates a smooth wing rim. Underneath, plate is used to secure all the slopes into position. On the short side, a modified 2×2 plate is used to clip the wing to the side of the ship. A similar technique is used at the other end of the wing to attach the wing flaps. The same build is mirrored on the other side to create the other “underwing.” The wingspan of the spaceship is impressive – it’s bigger than the box it comes in. So, before building, you can get an idea of the display space you will need.
The upper wings are smaller and have more detail than the lower ones. Their build begins by connecting two triangular grey plates, creating an 18-stud-long element. Similar to the underwings, the long side of the wing is covered in tan slopes and tile to generate a smooth surface. A large modified slope sits atop the wing, leaving six studs between it and the ship for weapons. This wing attaches to the chassis at the top via a plate-to-plate connection, so unlike the underwing, it is rigid. To finish this build stage, the mirror image is constructed for the other side, completing the core of all the wing structures.
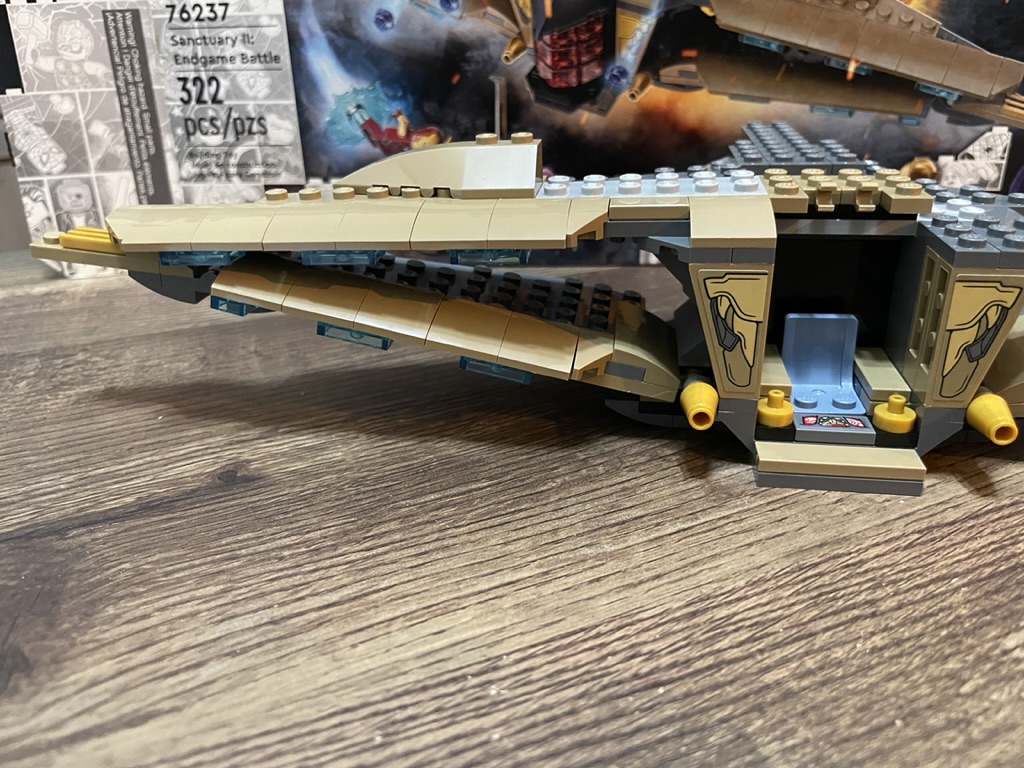
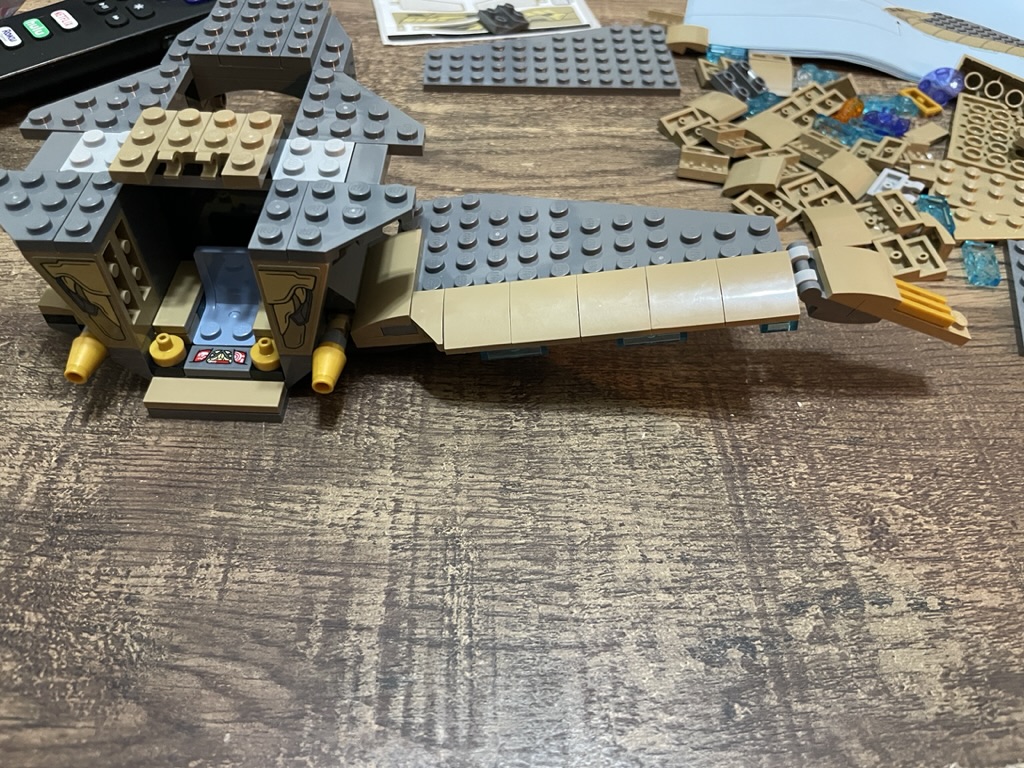
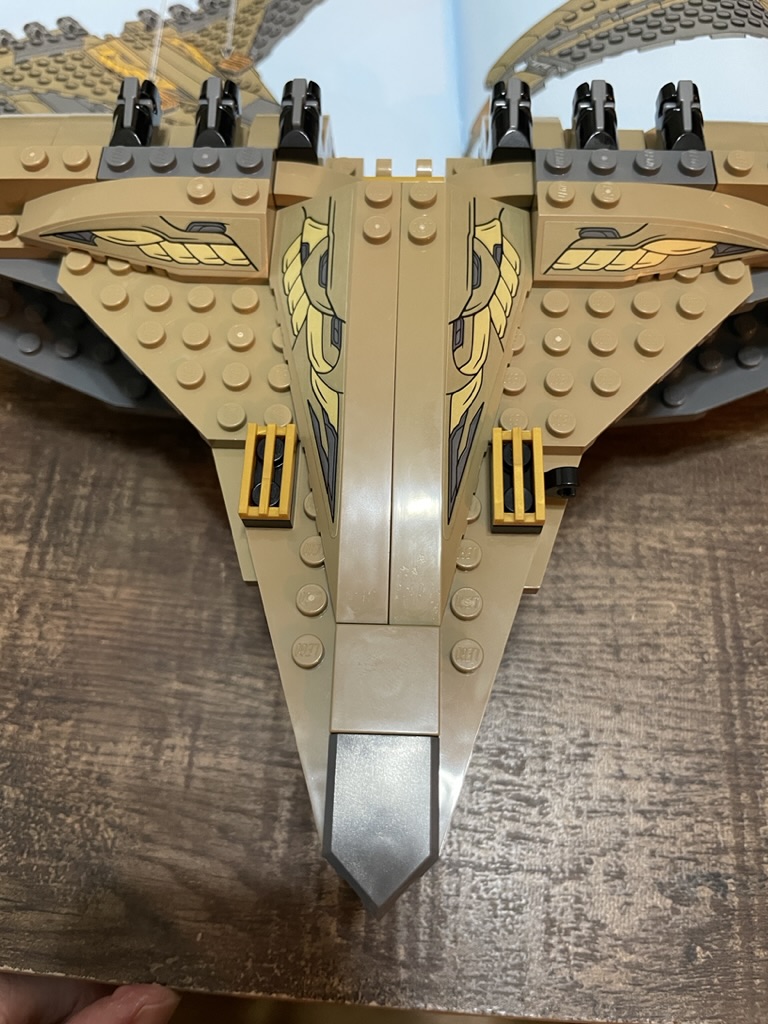
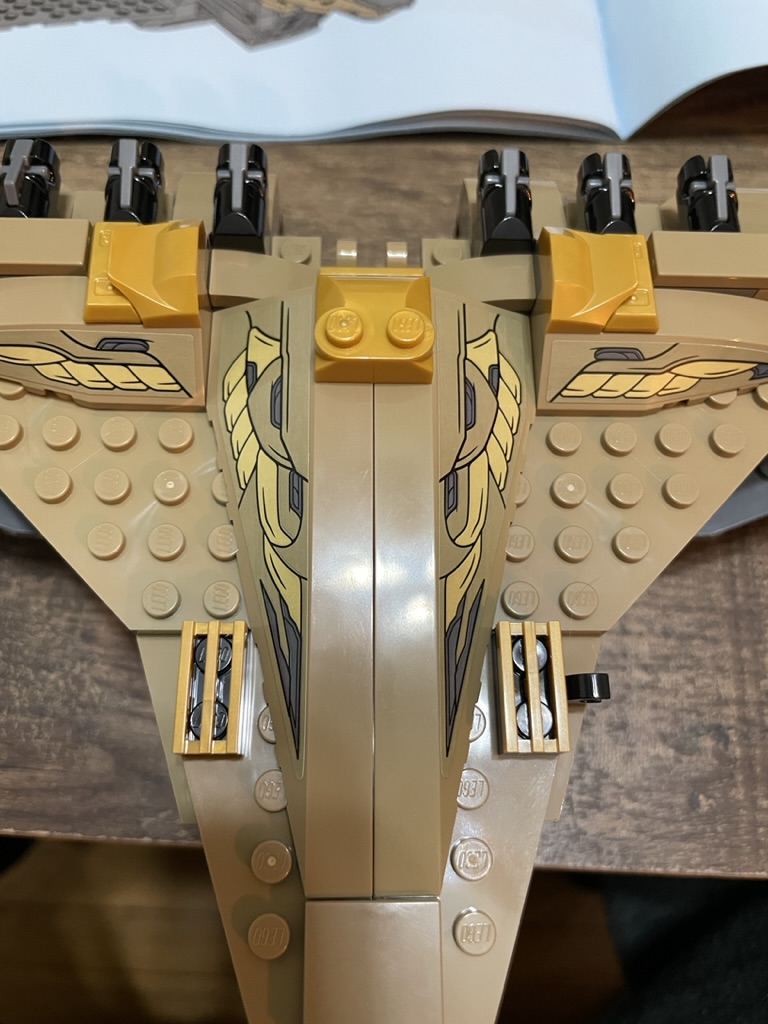
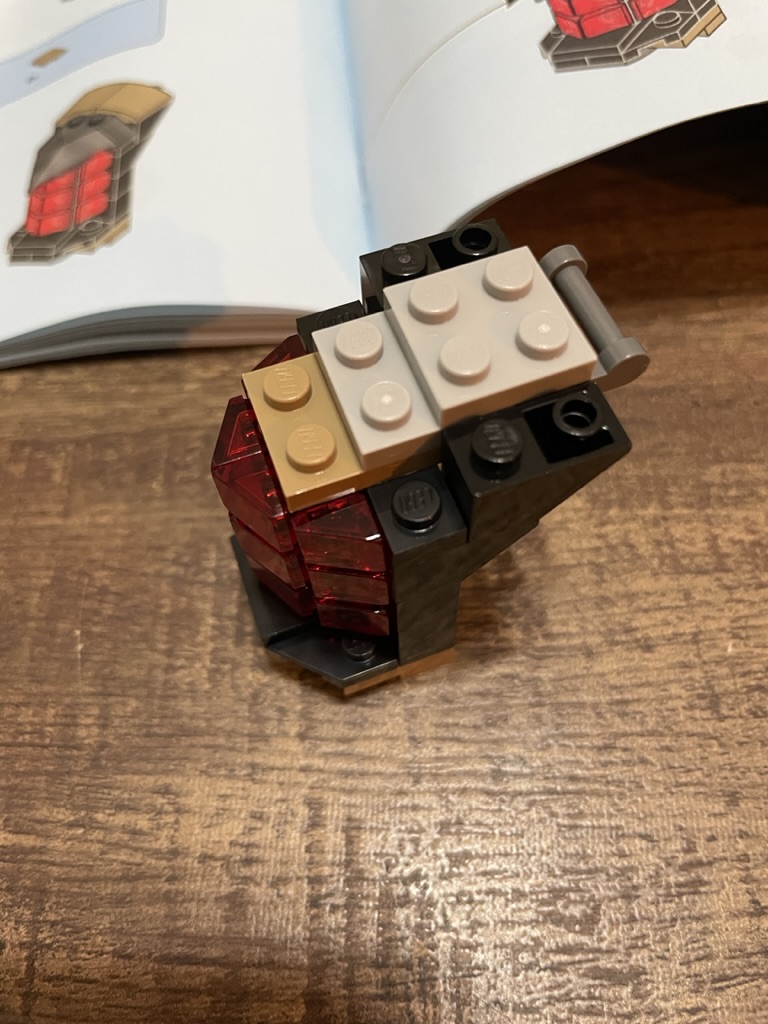
Stage three focuses on adding details and covering the reaming plate in the build. First, a tan plate covers all the grey and white plate from the previous stages. Next, the six shooters are positioned at the aircraft’s top, separated by slopes and tan cheese wedges. The blasters are held in place with a 1×4 dark grey plate. Two tan slopes and a yellow grill hold the underlying tile in place.
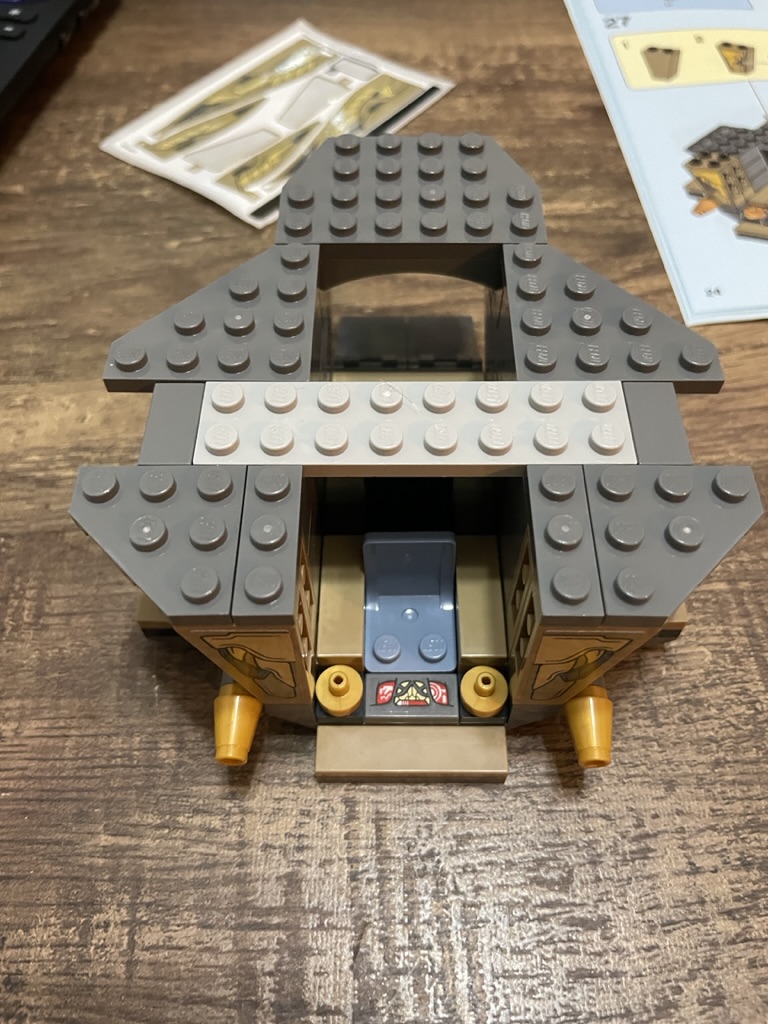
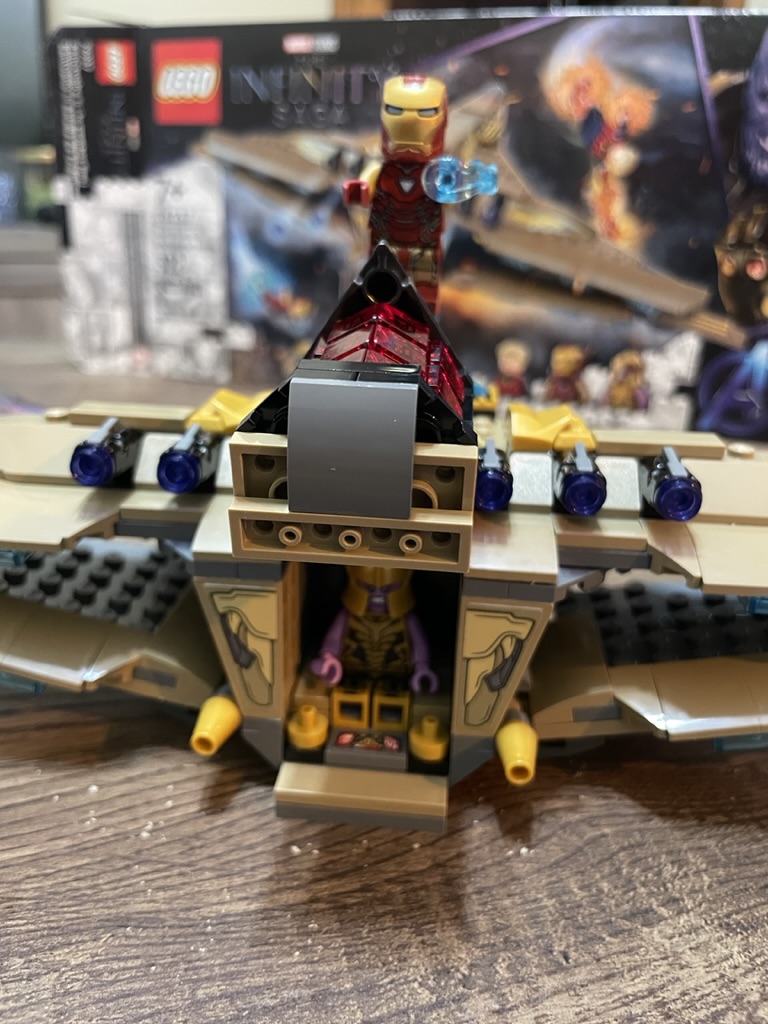
At the rear, a large sticker element is placed on a modified tan slope. It is stressful, as the opposing brick must align, or the ship’s top will look horrendous, and I couldn’t possibly look at it! The same precision applies to the smaller slopes behind the blaster guns. A modified 1×2 black plate with a clip is placed on the ship’s right side, and a non-modified one is placed on the left. They are covered with yellow grills as a nice piece of design. The ship’s tail is tiled off with a 2×2 tan tile and a dark grey shield piece.
The front of the ship is given a bit of bling with five gold pieces – two ingots covered with modified 2×2 pieces and then studded 2×2 slope.
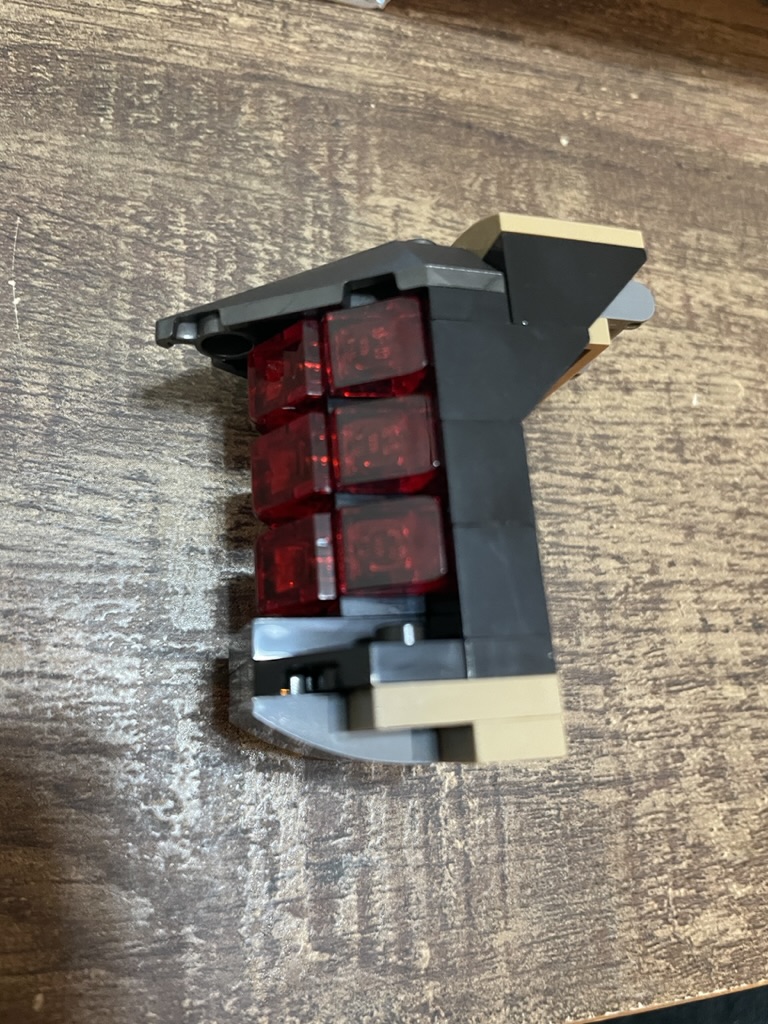
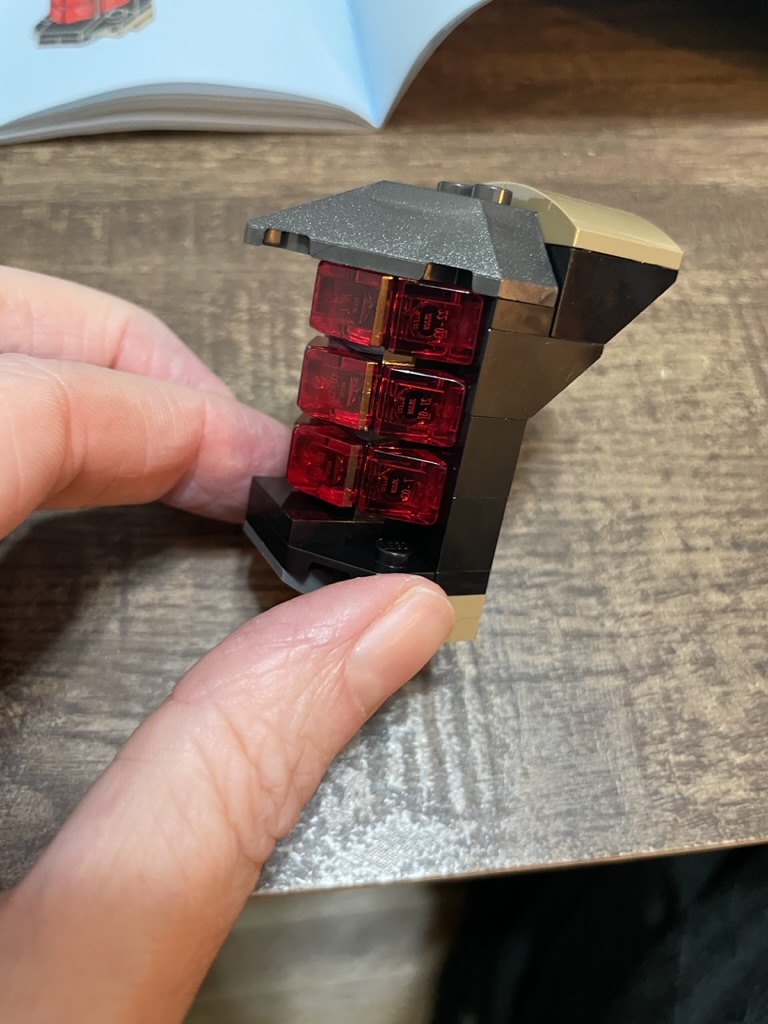
The last part of the build is the cockpit covering, which will hinge upward to allow access to the pilot seat. First, the basic structure is generated by stacking black plate, brick, and slopes. Two layers of tan plate sit at the bottom of the structure to blend with the spaceship. Upon a series of SNOT bricks, transparent red cheese wedges are placed to create a window effect that mimics the red lights seen glowing through the front in the movies. On the top, the stacked plate generates more height and secures a dark grey modified 1×2 plate, which will clip this mini-build to the front of the ship. A wedge slope and tan arches cover that plate to fit the rest of the design. When clipped into place, the build is complete.

As this is Thanos’ spaceship, I popped him in the cockpit, though it is deeply beneath Thanos to be flying! He does look good in there, though, especially with that expression! I used the two available gold studs at the top to mount Iron Man and then played around with a few positions for Captain Marvel. I used the random clip on the left slide to mount Thanos’ double-edged sword, as there was nowhere else to put the weapon due to its length. The cargo bay is just big enough for the gauntlet shrine.

Set review
For $40, I am left feeling a little unfulfilled after finishing the build. The dark tan and grey color scheme is depressing and doesn’t look pleasing to the eye. The Lego designers are in a bind, as the ship is dulled gold, so to stay authentic, this is probably the color scheme they needed to go for. Maybe the correct lighting can make the
I always find sticker elements that need to be perfectly aligned with one another to be a high-anxiety moment in a Lego build – a hobby that is meant to be a stress-relieving escape, so this isn’t ideal. For once, that is not my main issue with the set; it’s the size of the cargo area. This is a pivotal place in the movies, yet, there isn’t room to place a minifigure in there, let alone have the space to recreate scenes from the film. The cockpit for Thanos also makes zero sense, and including a Chaturi would have been a good move. While I love Iron Man, he didn’t have much to do with this spaceship, so he is not an obvious choice to include in this set. I can only guess that Lego knows he is a popular figure, and his inclusion would help the set sell.
While I accept that not all sets can be at the $100 price point (and I am glad some I want are in the $20-40 range), this set pales compared to the Guardians ship and the new Quinjet. Yet, this ship is the big bad and looks puny next to the others when displayed. I hope they make a more extensive, near-UCS version in the future, but that doesn’t seem likely, as this set didn’t sell particularly well.
To solve my issues with the set, I will likely modify it to double the interior’s size, giving room for two seats in the cockpit and more space in the cargo bay.
Ratings
Build: 2/5
This was my first aircraft in Lego, so I enjoyed seeing the spaceship coming together. The build is straightforward and well suited to all ages, as it is a layering build without many tiny pieces. Despite constructing four wings, I didn’t find it repetitive.
The set doesn’t include any unusual pieces, nor does it have any part usage that will make you nod in respect for the designer.
Display: 2/5
This is not a pretty ship – the dark tan and grey produce a dull and unimpressive set that isn’t pleasurable to look at. The color scheme is the biggest issue, as the design is an excellent low-cost replica of the ship from the movies. Due to the price point and wingspan of the spacecraft, I understand why things are “missing” from the set. The front window looks decent but doesn’t capture the intricate design of the craft. I find placing Captain Marvel in the rear – which is the only way to attach her in action, means it’s hard to see her wrecking havoc – so including a bit more thought into clip location or including transparent mounts would have been appreciated. I have Iron Man standing on top, which doesn’t make much sense. Thanos in the cockpit has no bearing on reality.
Price: 3/5
At $40 for 322 pieces, this set at a price per piece (PPP) of 12.4 cents. Considering it’s a licensed set with three minifigures with many accessories, this price seems fair, if not spectacular. I did pick it up for $32, bringing the PPP to just under 10 cents, which makes it far more palatable.
Final thoughts
Sanctuary II: Endgame is an underwhelming entry in Lego’s Infinity Saga lineup. To keep the price point obtainable, the ship’s design required compromises that resulted in a lackluster final build. Due to this set being a poor seller, I doubt we will get a more expensive, detailed version of Thanos’ ship, so it’s still worth picking up for MOCs or to complete your collection. The two unique minifigures will also help the set pay for itself in a few years.

Leave a comment