
Deciding to build a Lego city is a massive undertaking. Not only do you need the financial resources to fund the project, but you also need time and space. The final element is tables upon which to build your plastic brick city. You could develop your town on the floor, but that seems a little barbaric.
If building a Lego city is a challenge, then it is one I accept gleefully.
I live in a large apartment for one person, so clearing space for some tables was relatively easy – though I debated where the Lego space would end up for several weeks. Ultimately, I went for the front room, which for most residents, would be the dining room. Until its reinvention as my Lego emporium, the space held the dining table I never ate at and hosted a spare couch I never sat on. So, I cleared the room and had a tremendous empty shell to fill with all the colorful bricks I could afford.
Buying a Lego table is more challenging than it might first appear. Based on the dimensions I could accommodate, I was looking for three 4×4′ tables with shelves underneath to double the space for scenes. I also knew I wanted something solid, not a plastic folding table. However, the dimensions I had in mind aren’t commonly commercially available.
I did shop around, but anything close to what I wanted was costly and made of excessive materials for a Lego table. Quickly, I knew custom was the only route open to me.
My first thought was to ask a colleague’s dad to make the tables (he’s retired and likes woodworking). However, that plan didn’t come to fruition. Around the same time, I had gone to the Home Depot to get a piece of board to put my winter village on. While in the lumber section, I realized it might be within my capabilities to get some wood and slap it together into a table. After all, I wasn’t looking for perfection, just sturdiness. I consulted my friend who would be visiting over the holidays, and we decided we could achieve the required level of craftsmanship to put something together.
Armed with self-belief, I started monitoring for sales to get a drill (I only had a screwdriver) and a saw to make the insets for the lower tables. I determined an electric saw would be best as it would be quicker and less tiring than a manual one. Here in Buffalo, there are tool rental shops that I could have used instead of buying. However, I decided that owning a drill was a good investment, and I see myself making many more tables in the future. Thus, the electric saw was an extravagant purchase, but one I hope to use for years. I was lucky and picked up a Black and Decker drill, and a saw during Black Friday. I went for the same brand so the batteries would be interchangeable. I also went for battery-operated to make the tools more versatile in the future. As I rent, I’ll have to move eventually!
So, I was organized. Safety goggles at hand, space cleared and ready for action. I got excited as the day of my friend’s arrival approached. December 30th was the planned big shopping day… then the Christmas blizzard came. I spent a week trapped inside my house, wondering when I could go out and if my friend would make it. Luckily, though delayed a day, it all worked out. So, armed with a $500 budget, we ventured out on December 31st to the Home Depot. I couldn’t think of a better way to end the year.
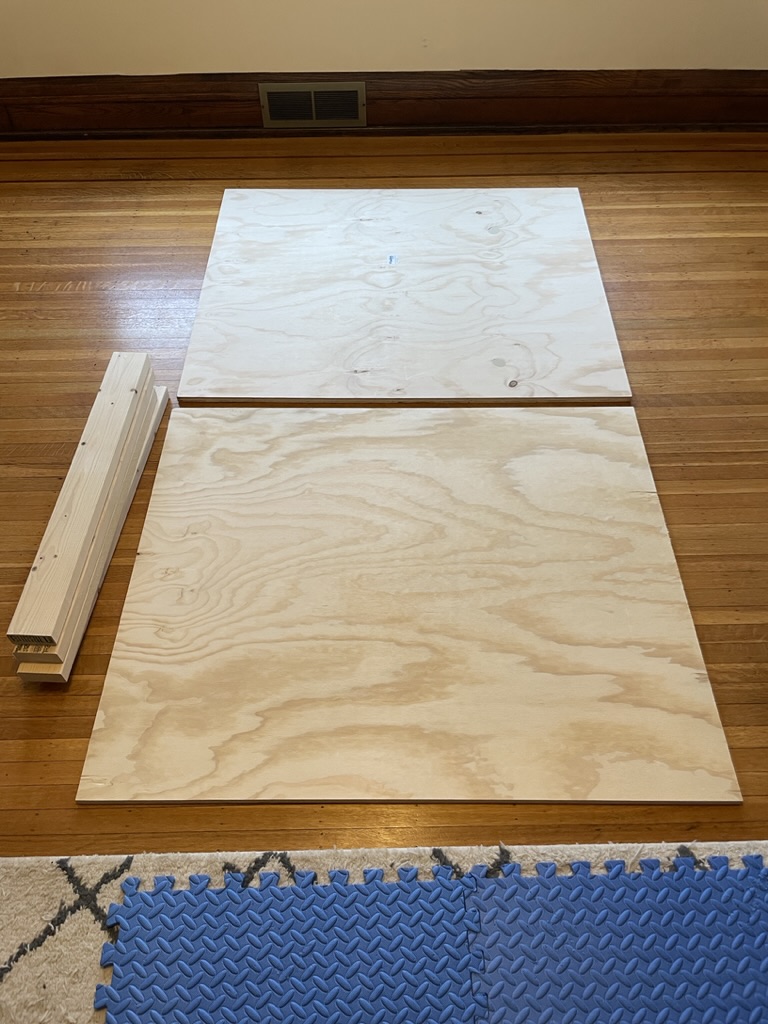
It took my friend and me far longer to select the top lumber than I care to admit – there were so many options. Eventually, I picked 23/32 radiata pine plywood. It seemed the best mix of strength, finish, and affordability.
Selecting the legs was also arduous. I wanted some 4×4″ legs, but the options they had were stressed, and I wasn’t impressed. I won’t overly bore you with the details, but I selected some nice 2×4″ that could be cut into thrids to make a great height.
Before getting the materials cut, we selected some screws and then spent an excessive amount of time choosing brackets. I wanted something easy but stable. In the end, I went for 6″ zinc corner braces which I decided after watching some YouTube videos in the store would work and be able to hold a Lego-covered board.
They were slightly understaffed, so we had to wait for the helpful employee for nearly 20 minutes, which generally would be fine, but we were hungry, which always makes things worse.
Anyway, the lovely chap cut my 8 feet table tops in half and my legs into thirds. I was so giddy and excited to see this project finally coming alive. It came under budget, too – $340 for the lot.
Then came the slight snag. Turns out you can’t get a 4-foot square into my car. It was close but would not work. We looked into hiring a truck (none) and then delivery (too late – my friend would be on the way home), so the only option left was to cut them smaller. Heartbreak and embarrassment washed over me. The man that cut the lumbar was watching us the entire time while he had a smoke break and you could see him mentally going, “I’m gonna have to cut these again.”
So, we went back in and got them reduced to 40″ as that’s four baseplates. Initially, my city will be 30 baseplates smaller than I had planned. Oh well. The good thing though? Forty inches does fit through my car door.

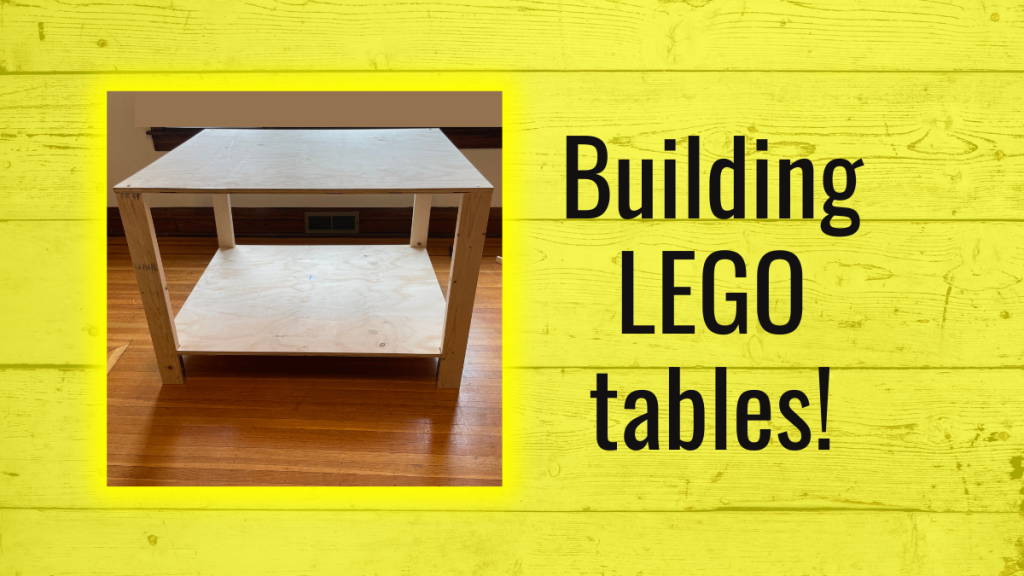
After celebrating the New Year, it was time to start the construction, which was straightforward and tedious. However, there was great joy when one table top was attached to four legs and stayed upright. Cutting the inserts for the bottom shelf was an unknown, but the saw worked a treat, and the finish was damn fine. I bought sandpaper to touch up the edges, but I barely needed it.
To make our lives easier, we used the bracket dimensions to set the height of the bottom table, as it turned out to be close enough to where I wanted it. My only real stipulation was that my robot vacuum cleaner could get under there, which it can! So, no measurements were needed! That made things far faster. Once table one was up, we stood back and considered it a good job done. Yes, slight tweaks were needed in the process, but it stands and looks exactly how I envisioned it.

After a decent break, the next two went up together; these were more satisfactory with cleaner cuts for the lower tables and better screw indents on the top. The only snag that we ran into was – my floor wasn’t level! I only realized this once we put the tables in place, and they wouldn’t sit flush. As an easy fix, I found some velcro and placed it around the top part of the legs to hold them together. I did the same to the other side so they would look symmetrical – otherwise, it would constantly bother me.

So, there you have it – my first set of Lego tables, with space for 120 baseplates. Behind them, the blind should keep the UV away, and I used a couple of those extra pieces of wood to block out the little gap between it and the bottom of the window. It might not look as charming from the outside, but the Lego is more important.
I know, I wrote a lot to say I bought some wood and made some tables, but this is the genesis of my city and it’s a big moment for me! My front room is wholly devoted to Lego now, except for a treadmill, which I may be able to move.
The great villains against my city are the cats, who all the minifig superheroes will need to unite against to defeat. Will they prevail? Stay tuned!

Leave a comment